
Connecting your Stripe account
If you want your community to sell paid event tickets or charge for memberships, it needs its own Stripe account. This guide walks you through connecting Stripe, including the second round of identity verification that catches many people by surprise.
If you want your community to sell paid event tickets or charge for memberships, your community needs its own Stripe account. This is the plumbing that lets buyers pay, lets the platform keep its small fee, and lets the rest of the money land in the bank account you set up for the community — automatically, without anyone at YeahApp touching it. This guide walks you through what to expect, including the "Stripe wants more info from you" round of verification that catches a lot of people by surprise.
One Stripe account per community. If you run more than one community on YeahApp, each one connects its own separate Stripe account. They each have their own KYC, their own bank account, and their own payouts. The setup steps below are the same for each — you just run them once per community on that community's finance page.
It assumes you've already created your community. If you haven't, start with Creating a Community on YeahApp, then come back here when you're ready to enable paid features.
Before you start
A few things to have ready and a few things to know:
- You must be the community owner. Connecting Stripe, managing the account, or unlinking it are all owner-only actions. Admins and moderators on your team can see whether the connection is healthy on the finance dashboard — they just can't change it. This is a deliberate guardrail: the Stripe account is bound to this community, and the community owner is the custodian who connects it. If you own a second community, that one will get its own separate Stripe account when its owner runs through this same flow there.
- Have your ID handy. A passport or national ID card. Stripe will ask you to upload a photo during onboarding.
- Have your bank details handy. The IBAN for the account where payouts should land. This is where money goes once buyers pay.
- Set aside ~10 minutes for the first pass, plus another few minutes a day or two later for the second round of verification (more on that below — it almost always happens).
- Check your country is supported. YeahApp is live in Europe first, so Stripe onboarding is open to 32 European countries today — the EU, plus Norway, Liechtenstein, the UK, Switzerland, and Gibraltar. If your country isn't on the list, the finance page shows a waitlist signup instead of an onboarding button. Free events and free memberships still work without Stripe — only paid features need it.
Why we picked Stripe
Stripe handles card numbers, identity checks, money routing, and bank transfers for us — so we never store your card data or your members'. It's the same backend that Substack, Patreon, and most of Europe's Software-as-a-Service products use.
Step 1: Open the finance page
In your community's management area, go to Finance. The exact path is /management/finance (you can bookmark it if you'll be coming back).
What you'll see depends on whether Stripe is already set up:
- Not set up yet → an orange "Set up payouts" card with a country selector and a Connect Stripe button.
- Country not supported → a blue card explaining which countries we support today, with an option to join the waitlist and get an email when yours opens. There's nothing to fill in: the card shows the email on your YeahApp account, read-only, and a single button. We deliberately use your signed-in account email rather than one you type, so nobody can put a third party on the waitlist. It's a one-click action, and joining again for the same country changes nothing.
- Already set up for this community → a green "Stripe connected" card with a Manage payouts button (and an Unlink button, which you almost certainly won't need). Note this is per-community: setting up Stripe for Community A does not show as set up on Community B's finance page.
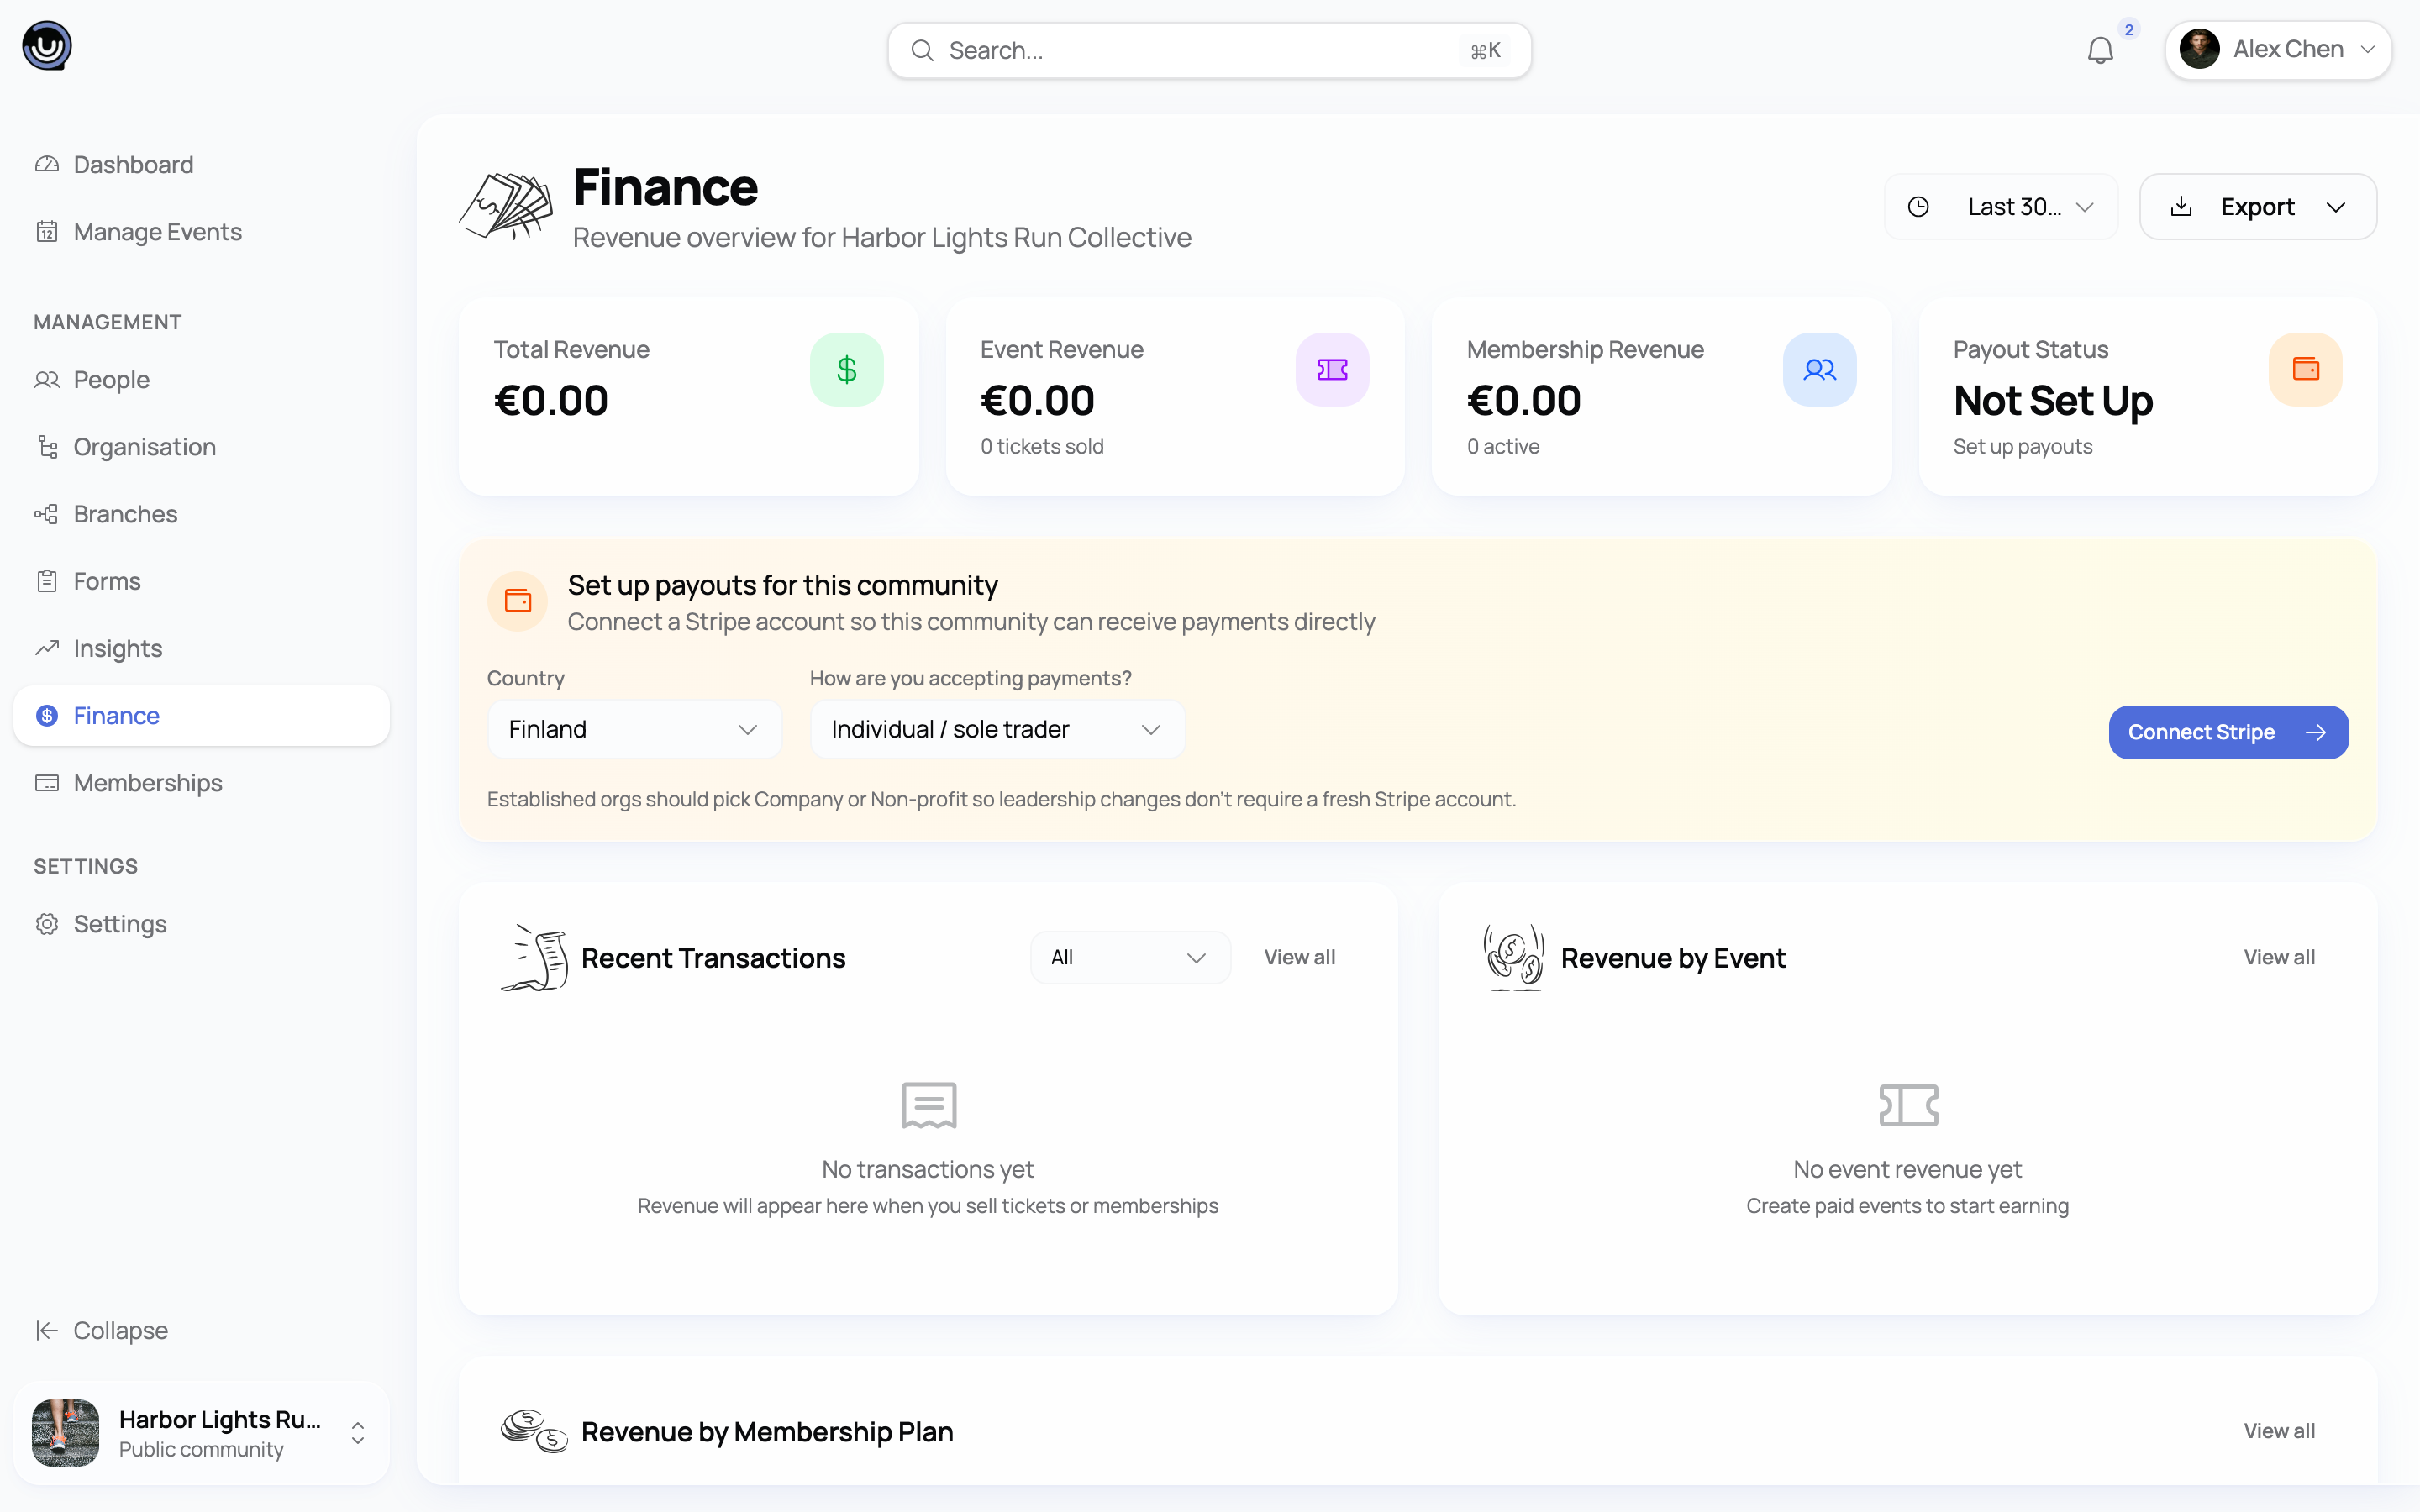
If you're seeing the "Set up payouts" card, you're in the right place. Pick your country from the dropdown — it should default to the country on your YeahApp profile, which is usually correct.
Pick your country carefully.
The country you choose here is the country your Stripe account will be registered in. It's the country whose tax authority gets your activity report. It's usually the country you're a tax resident of, not necessarily the country where your community members live or where your events happen. If unsure, pick the country your bank account is in. You can't change this later — you'd have to unlink and start over.
Step 2: Pick your entity type (this is the big one)
Before you click Connect Stripe, take a moment to think about how you want Stripe to verify you. This decision is permanent in practice, and getting it wrong costs you weeks of unwound work later. The full reasoning is in Setting up your YeahApp account — best practices, but here's the short version:
- Individual / sole trader — you're verified personally. Quick to set up. The Stripe account is tied to your specific identity, so if you ever hand the community to someone else, the new owner has to start fresh with a brand-new Stripe account.
- Company / business — for registered companies (LLC, Ltd, GmbH, BV, OY, etc.). The Stripe account is tied to the company, with you listed as the representative. Leadership change is a Stripe form, not a re-onboarding.
- Non-profit / association / charity — for registered non-profits, associations (vereniging, association loi 1901, e.V., aps, etc.), foundations, charities. Same as Company in spirit — bound to the entity, not to you personally.
If your community is run by a registered organisation, pick Company or Non-profit, even if you (personally) are the only one signing up today. You'll thank yourself when leadership rotates in two years.
You'll be asked this question on Stripe's side, not on YeahApp's side, during onboarding.
Step 3: Click Connect Stripe and complete onboarding
Once you click the button, you're sent to Stripe's hosted onboarding (a stripe.com URL, on Stripe's domain — your card and ID data never touch our servers). Stripe will ask you to fill in:
- Personal details — name, date of birth, address, phone, last digits of national ID
- Business details if you picked Company / Non-profit — legal name, registration number, registered address, your role in the organisation
- Bank details — the IBAN where payouts land
- Identity document — usually a passport or national ID card photo
This usually takes 5–10 minutes. If you bail out partway, no problem — Stripe saves your progress and you can resume by clicking the Connect button again from Finance.
In sandbox / test mode, Stripe shows a "Use test data" button at the top of each form. Click it and Stripe autofills everything with test values. Use routing 110000000 and account 000123456789 for the bank step. This is only for the test environment — real onboarding requires real data.
When you finish, Stripe redirects you back to YeahApp's finance page. Your status will probably read Pending — that's normal, see the next step.
Step 4: The second round of verification (the surprise)
This is the part that catches almost everyone off guard, so we're calling it out explicitly.
Stripe rarely activates an account on the first submission. Within minutes to a day after you finish onboarding, Stripe usually sends you an email saying it needs additional information to verify you — sometimes a clearer photo of your ID, sometimes proof of address, sometimes a verification of your business registration number, sometimes a selfie holding your ID. Which one depends on your country, your entity type, and Stripe's risk model.
The email comes from Stripe directly (not YeahApp), and it has a verification link that opens a continuation of the onboarding form. Click it, upload whatever Stripe is asking for, submit.
Don't ignore that email. Until you complete the second round:
- Your status on YeahApp's finance page stays Pending
- You can't create paid events or paid membership plans (the platform blocks this on purpose — without a fully verified Stripe account, money would have nowhere to land)
- Buyers can't pay you
Once you submit the additional info, Stripe usually verifies within minutes to a few hours. The status on your finance page will flip to Active automatically (Stripe sends us a notification and we update the dashboard).
If you didn't get the email, check spam first, then go to the Manage payouts page on YeahApp (/management/finance/payouts) and click into your Stripe Dashboard from there. The Stripe-hosted dashboard shows any outstanding requests at the top — same link, just routed through us.
Step 5: Confirm everything is active
When the second-round verification clears, head back to this community's /management/finance page. The status card should now read Stripe connected in green, with the subtitle "Payouts are active on this community's Stripe account."
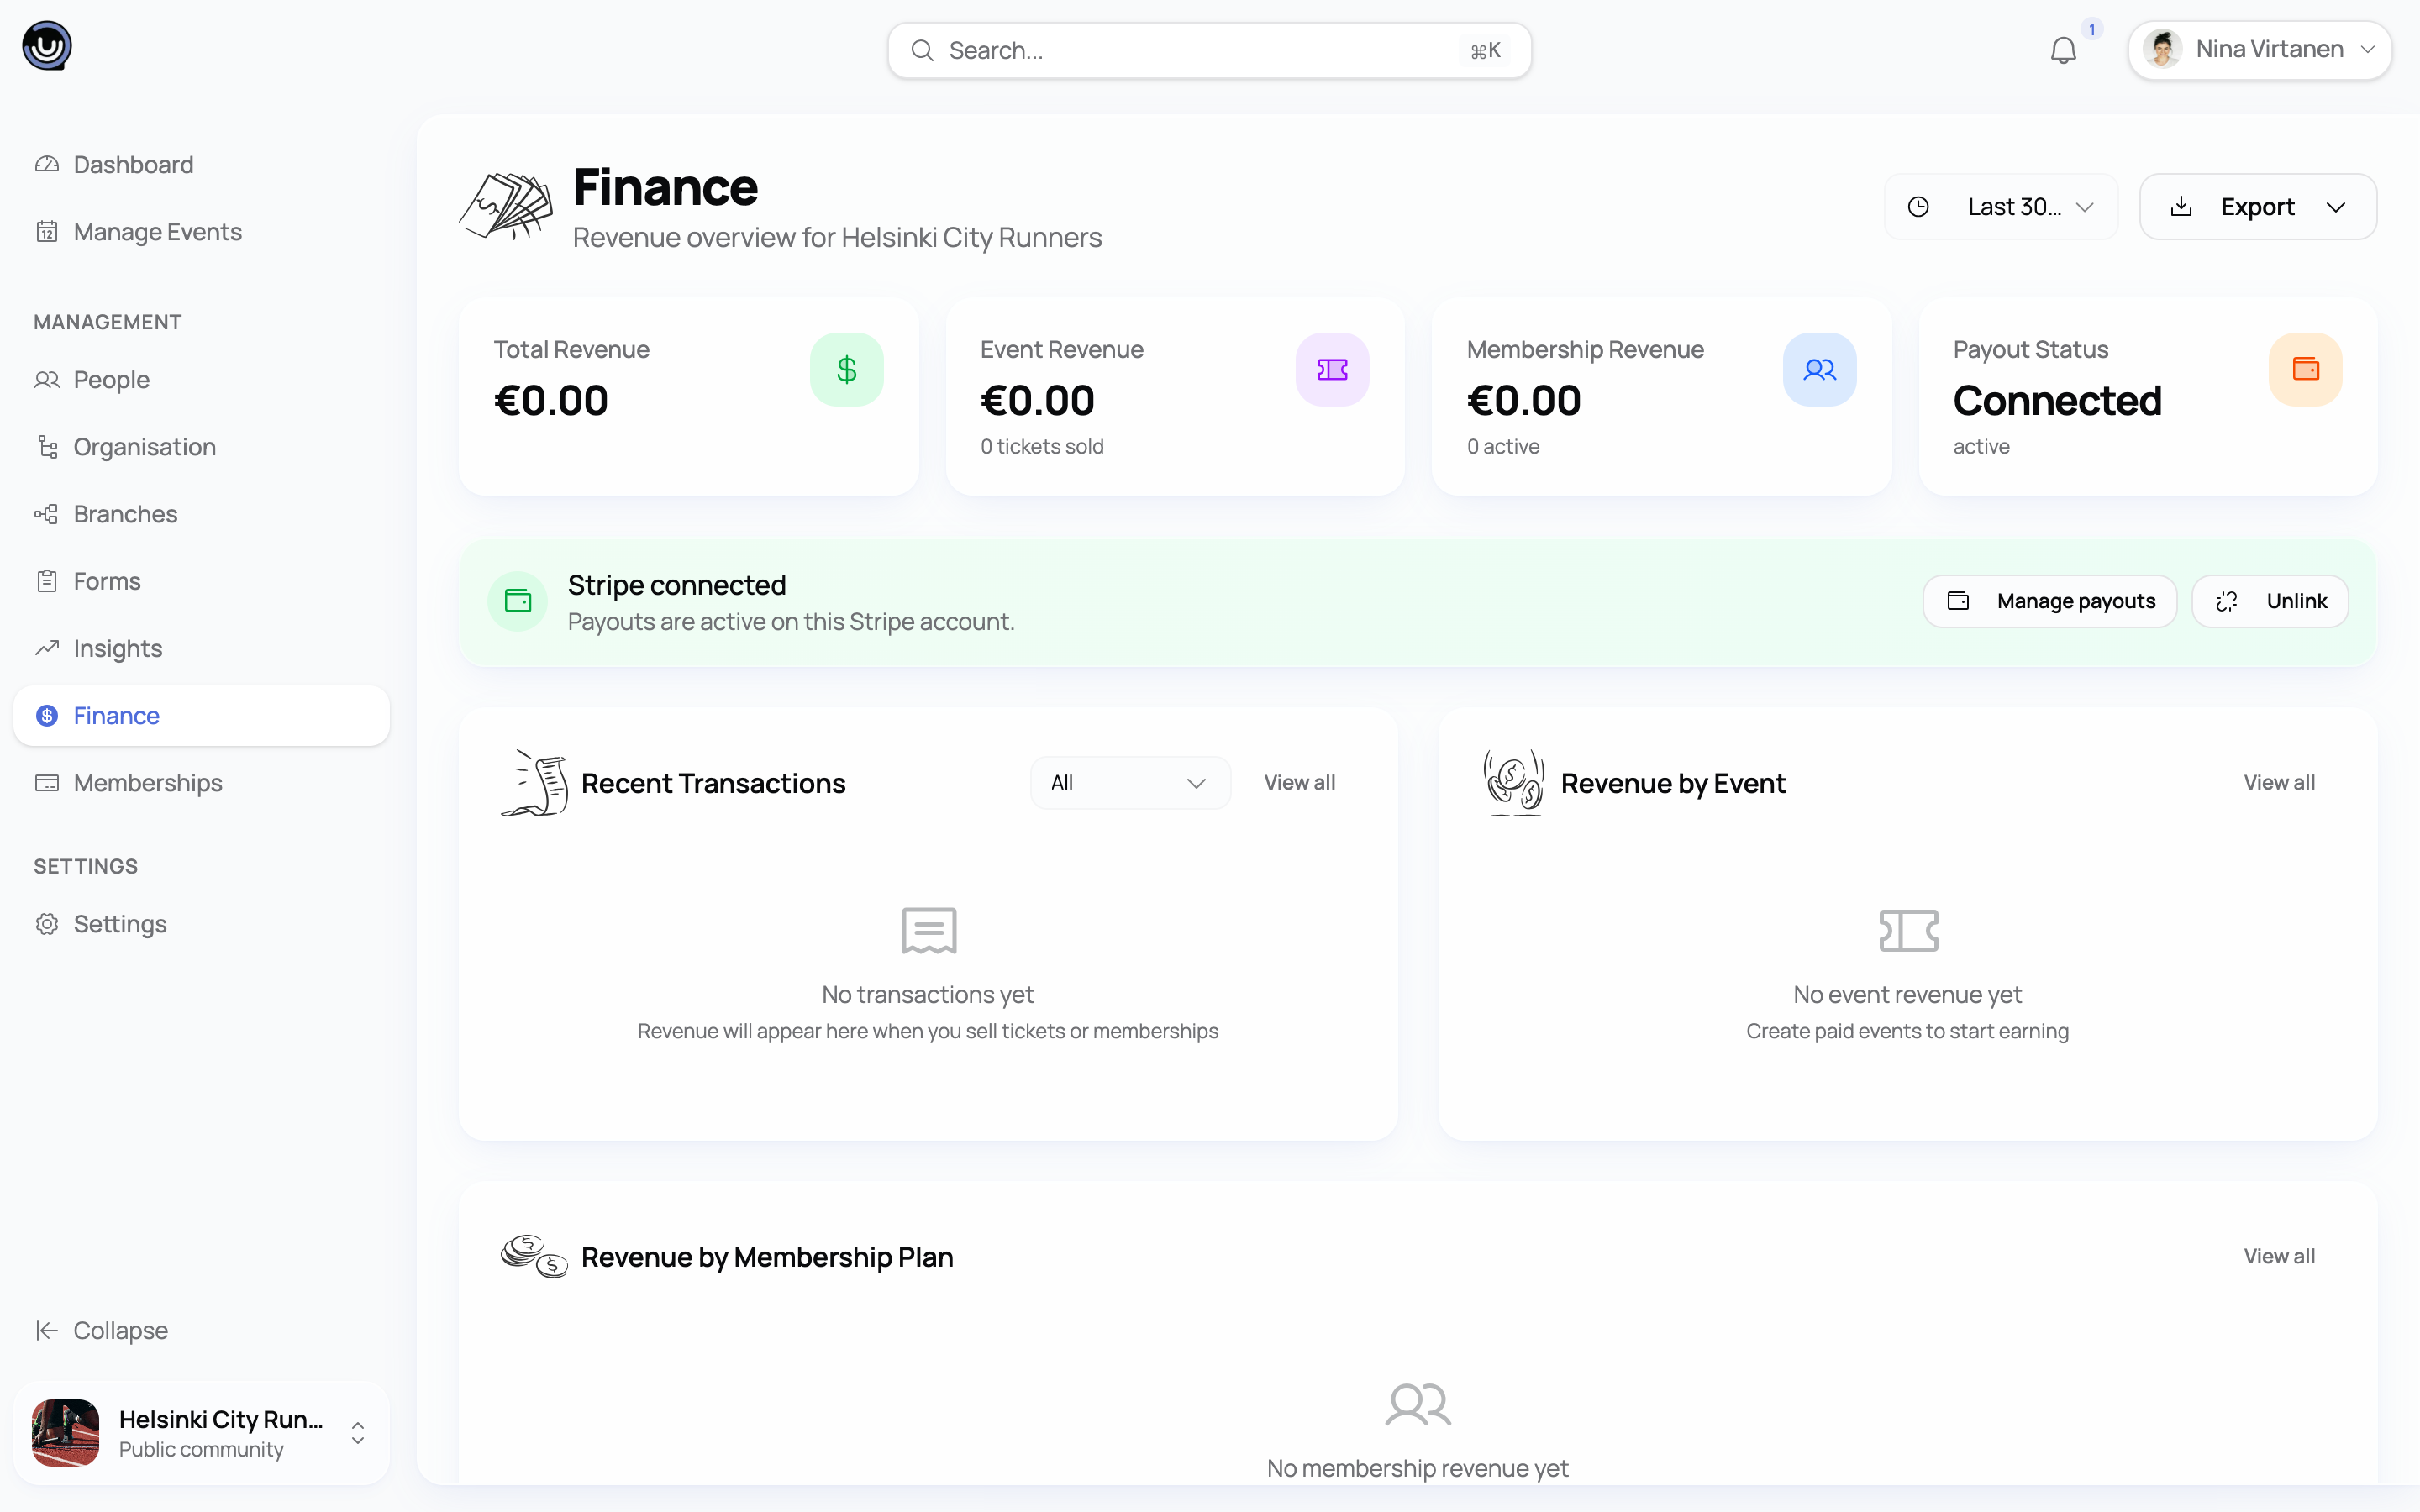
You're done. From this point on:
- Buyers paying for tickets or memberships are charged on Stripe's side
- Stripe automatically splits the money — platform fee to YeahApp, the rest to your Stripe balance
- On a regular schedule (usually weekly, depending on your country), Stripe transfers your balance to your bank account
- You'll see incoming payouts in the Manage payouts page on YeahApp, and full transaction detail in your Stripe Express Dashboard (linked from there)
You can now go and create a paid event or a paid membership plan.
What if my account never moves to "Active"?
The most common reasons accounts stay stuck in Pending:
- You haven't responded to Stripe's additional-info request. Search your inbox (and spam) for "Stripe" in the days after onboarding. Click the link in the email and complete the form.
- Your ID photo wasn't legible. Stripe sends a follow-up email asking for a clearer one. Use a flat surface, good lighting, no glare on the laminate.
- Your business registration number couldn't be verified automatically. Stripe sometimes asks for a copy of your registration certificate or articles of association. Upload what they ask for.
- The bank account couldn't be verified. Sometimes Stripe sends a tiny test deposit (a few cents) to confirm the IBAN is valid. Check your bank.
- Compliance review. For some industries and some countries, Stripe runs a manual review that takes 1–3 business days. There's no shortcut here — you wait.
If you've responded to everything and you're still stuck after a week, contact Stripe support directly through the link in your Express Dashboard (/management/finance/payouts → Stripe Dashboard button). YeahApp can't accelerate Stripe's verification — they're the regulated party.
Day-to-day after activation
A few things you should know for normal operations:
Where to manage your Stripe account. From /management/finance/payouts, click Stripe Dashboard. This opens your Stripe Express Dashboard — a Stripe-hosted page where you can see incoming payments, change your payout bank account, update your address, download tax documents, and see any verification banners Stripe wants you to act on.
Payout schedule. Stripe pays you out on a default schedule that depends on your country (usually weekly in EU, daily in US). You can change this in your Express Dashboard under Settings → Payouts.
Refunds. When a refund goes through your event's refund process, Stripe returns the full amount the buyer paid — including the platform fee — and draws it from your community's Stripe balance. See the Event refund process for the full policy.
Disputes / chargebacks. If a buyer disputes a charge with their card issuer, Stripe holds the disputed amount and asks you to respond with evidence. You handle this directly in the Express Dashboard. YeahApp is not the merchant of record — we don't own this conversation.
If you ever need to switch to a different Stripe account for this community. From the green "Stripe connected" card on /management/finance, click Unlink. This deletes the connection on Stripe's side and removes the link for this community in our database. You can then connect a new one. Don't do this lightly — pending payouts on the old account will still pay out as scheduled, but new sales would fail until a new account is connected. Other communities you own are unaffected.
If you're handing the community over to someone else (a new chairperson, a co-founder, a successor): use the Transfer ownership flow in Community Settings → Danger Zone instead of unlinking Stripe yourself. The transfer flow walks the new owner through whatever Stripe-side change is needed (a fresh setup if you onboarded as Individual, a representative update if you onboarded as Company or Non-profit).
A quick visual summary
Things that often trip people up
Picking the wrong country. Your Stripe account country is the country you're tax-registered in, not the country your members live in. If unsure, the country your bank account is in is usually right.
Skipping the second-round email. It will arrive. Check spam if you haven't seen it after a day. Don't try to "speed up" by re-running onboarding — that just creates a duplicate account.
Picking Individual when you're actually a registered organisation. This is the single most common — and most painful — mistake. Read Setting up your YeahApp account — best practices before you start onboarding if your community is run by a registered legal entity.
Inviting an admin to "manage Stripe for me." They can't. Connect actions are owner-only by design. If your admin needs visibility into payouts, they can see the operational status on /management/finance (whether the connection is healthy), but they can't onboard, manage, or unlink the account. Only you can.
Treating "Pending" as broken. Pending almost always means "Stripe asked for something and is waiting on you." Check the email. Check the Express Dashboard. The fix is on your side 95% of the time.
What's next
- Setting up your YeahApp account — best practices — the one you should read before Stripe onboarding if your community is a registered org. Decides Individual vs Company vs Non-profit.
- Creating and organising an event — once Stripe is active, this walks through paid ticketing.
- Creating a membership plan — same idea for recurring membership dues.
- Event refund process — refund policy and how the platform fee works on returns.