
Understanding your community's money
How to read your community's Finance dashboard — the three revenue streams, stat cards, per-event and per-plan breakdowns, the transaction ledger, CSV export, and the Stripe payouts panel.
Every euro your community earns — from ticket sales, paid memberships, or sponsorships from a co-hosting community — flows through one place: Finance. This guide walks through what's on the dashboard, how to read the numbers, and where to go for detailed payout management.
Heads up. Only the community Owner and Admins can see Finance. Moderators and Members don't have access to revenue or transaction detail. The payouts and Stripe Connect panel goes one step further and is Owner-only — see Connecting your Stripe account for why.
Where to find it
Open Finance from your community's management area. If you manage more than one community, double-check the right one is selected — Finance always shows figures for a single community, not a combined view across everything you run.
Finance is made up of five screens:
- Overview — stat cards, revenue-stream summaries, and your most recent transactions
- Events — revenue broken down per event, plus every ticket purchase
- Memberships — revenue broken down per plan, plus every membership payment
- Transactions — the full ledger across all three revenue streams
- Payouts — Stripe Connect status and onboarding (Owner-only)
The three revenue streams
Finance aggregates everything your community earns into three sources:
- Event ticket sales — money collected from paid tickets to your events.
- Paid memberships — recurring dues collected from members on a paid membership plan.
- Co-host sponsorships — your net take when another community sponsors an event you're hosting together. See Co-hosting an event with another community.
At-door and cash ticket sales carry no platform fee. The platform only takes its percentage from money that actually moves through Stripe. If you mark a ticket as sold at the door, or take a free registration, it shows up in your figures at its full value with a genuine zero fee attached.
Overview stat cards
At the top of the Overview screen, pick a time range: last 7 days, last 30 days (the default), last 90 days, last year, or all time. Changing it refreshes every card and breakdown on the page.
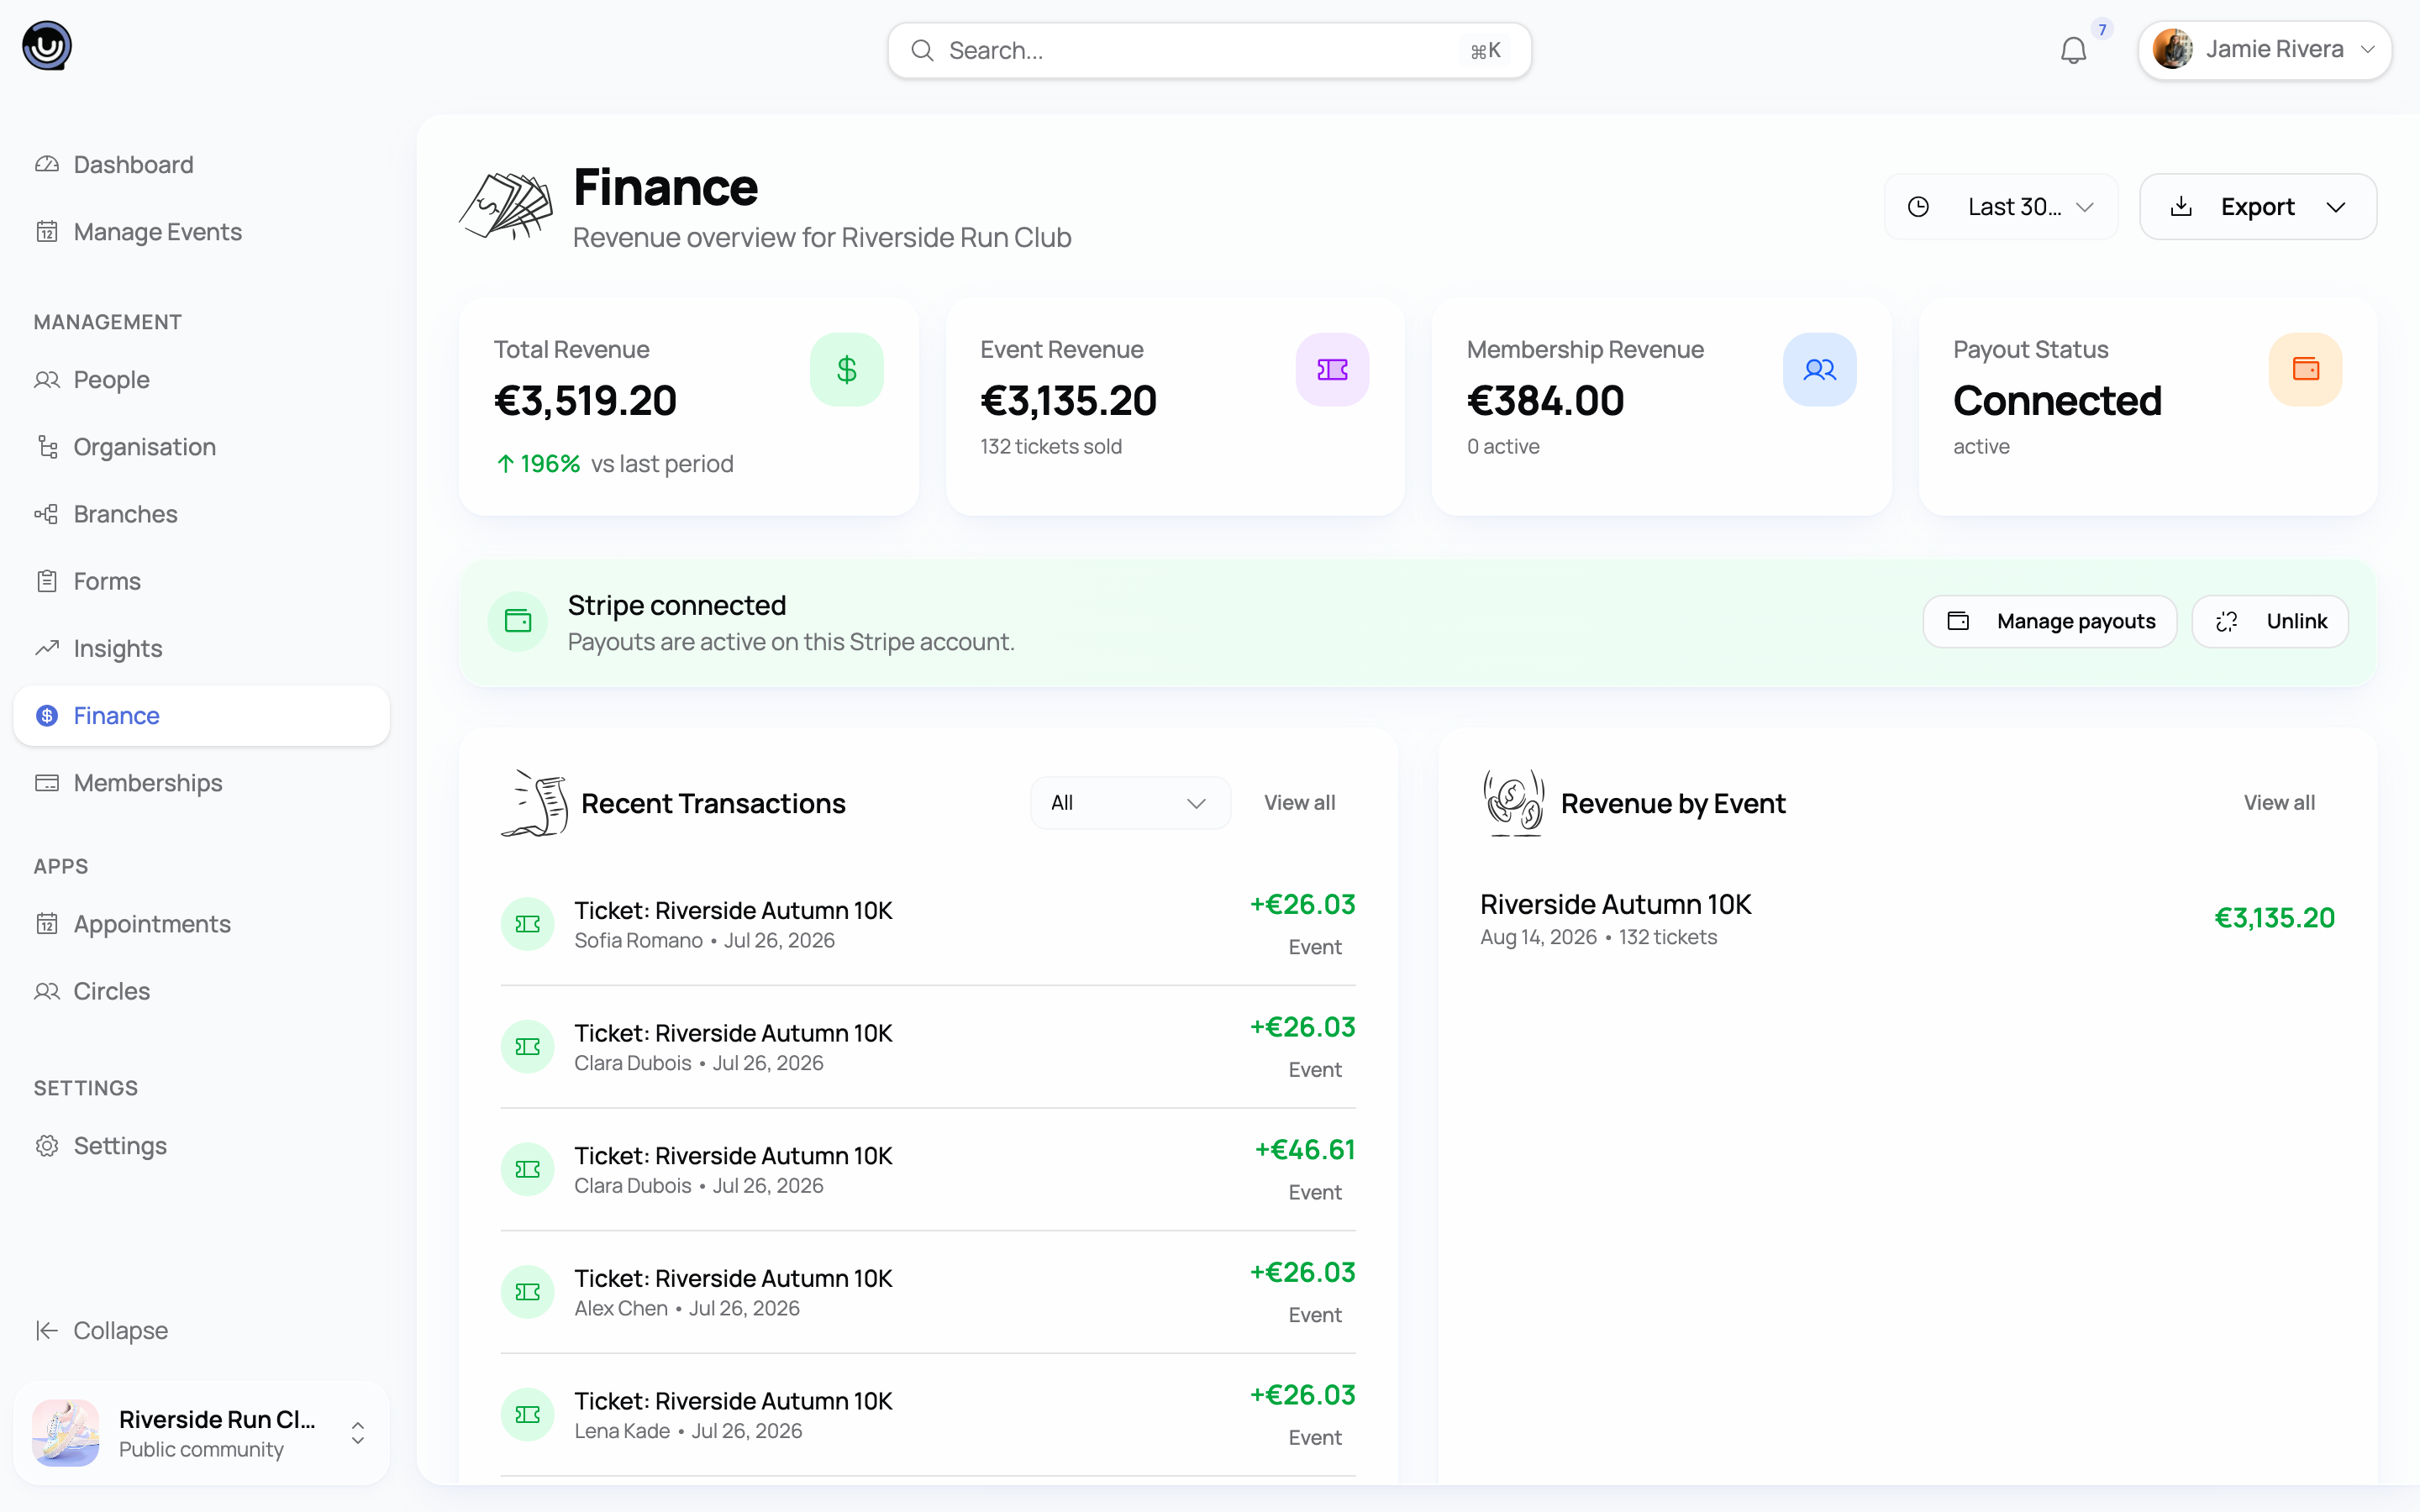
Each revenue stream gets a total for the selected period. Event and membership totals also show a percentage change against the immediately preceding period of the same length — so "last 30 days" compares against the 30 days before that. The change badge is hidden when there's nothing to compare (a 0% change). Sponsorship revenue is shown as a total but isn't compared period-over-period.
Membership revenue is what was actually collected, not your plan price times your subscriber count. If a payment fails or a subscriber gets a refund, that's reflected in the total. Don't estimate your membership income by multiplying your plan price by your member count — check the actual figure here instead.
Per-event and per-plan breakdowns
The Events screen lists every event that sold tickets, with the revenue and number of tickets sold for each. The Memberships screen lists every membership plan, showing both its list price and the revenue it's actually generated — those two numbers can differ once refunds and failed payments are accounted for.
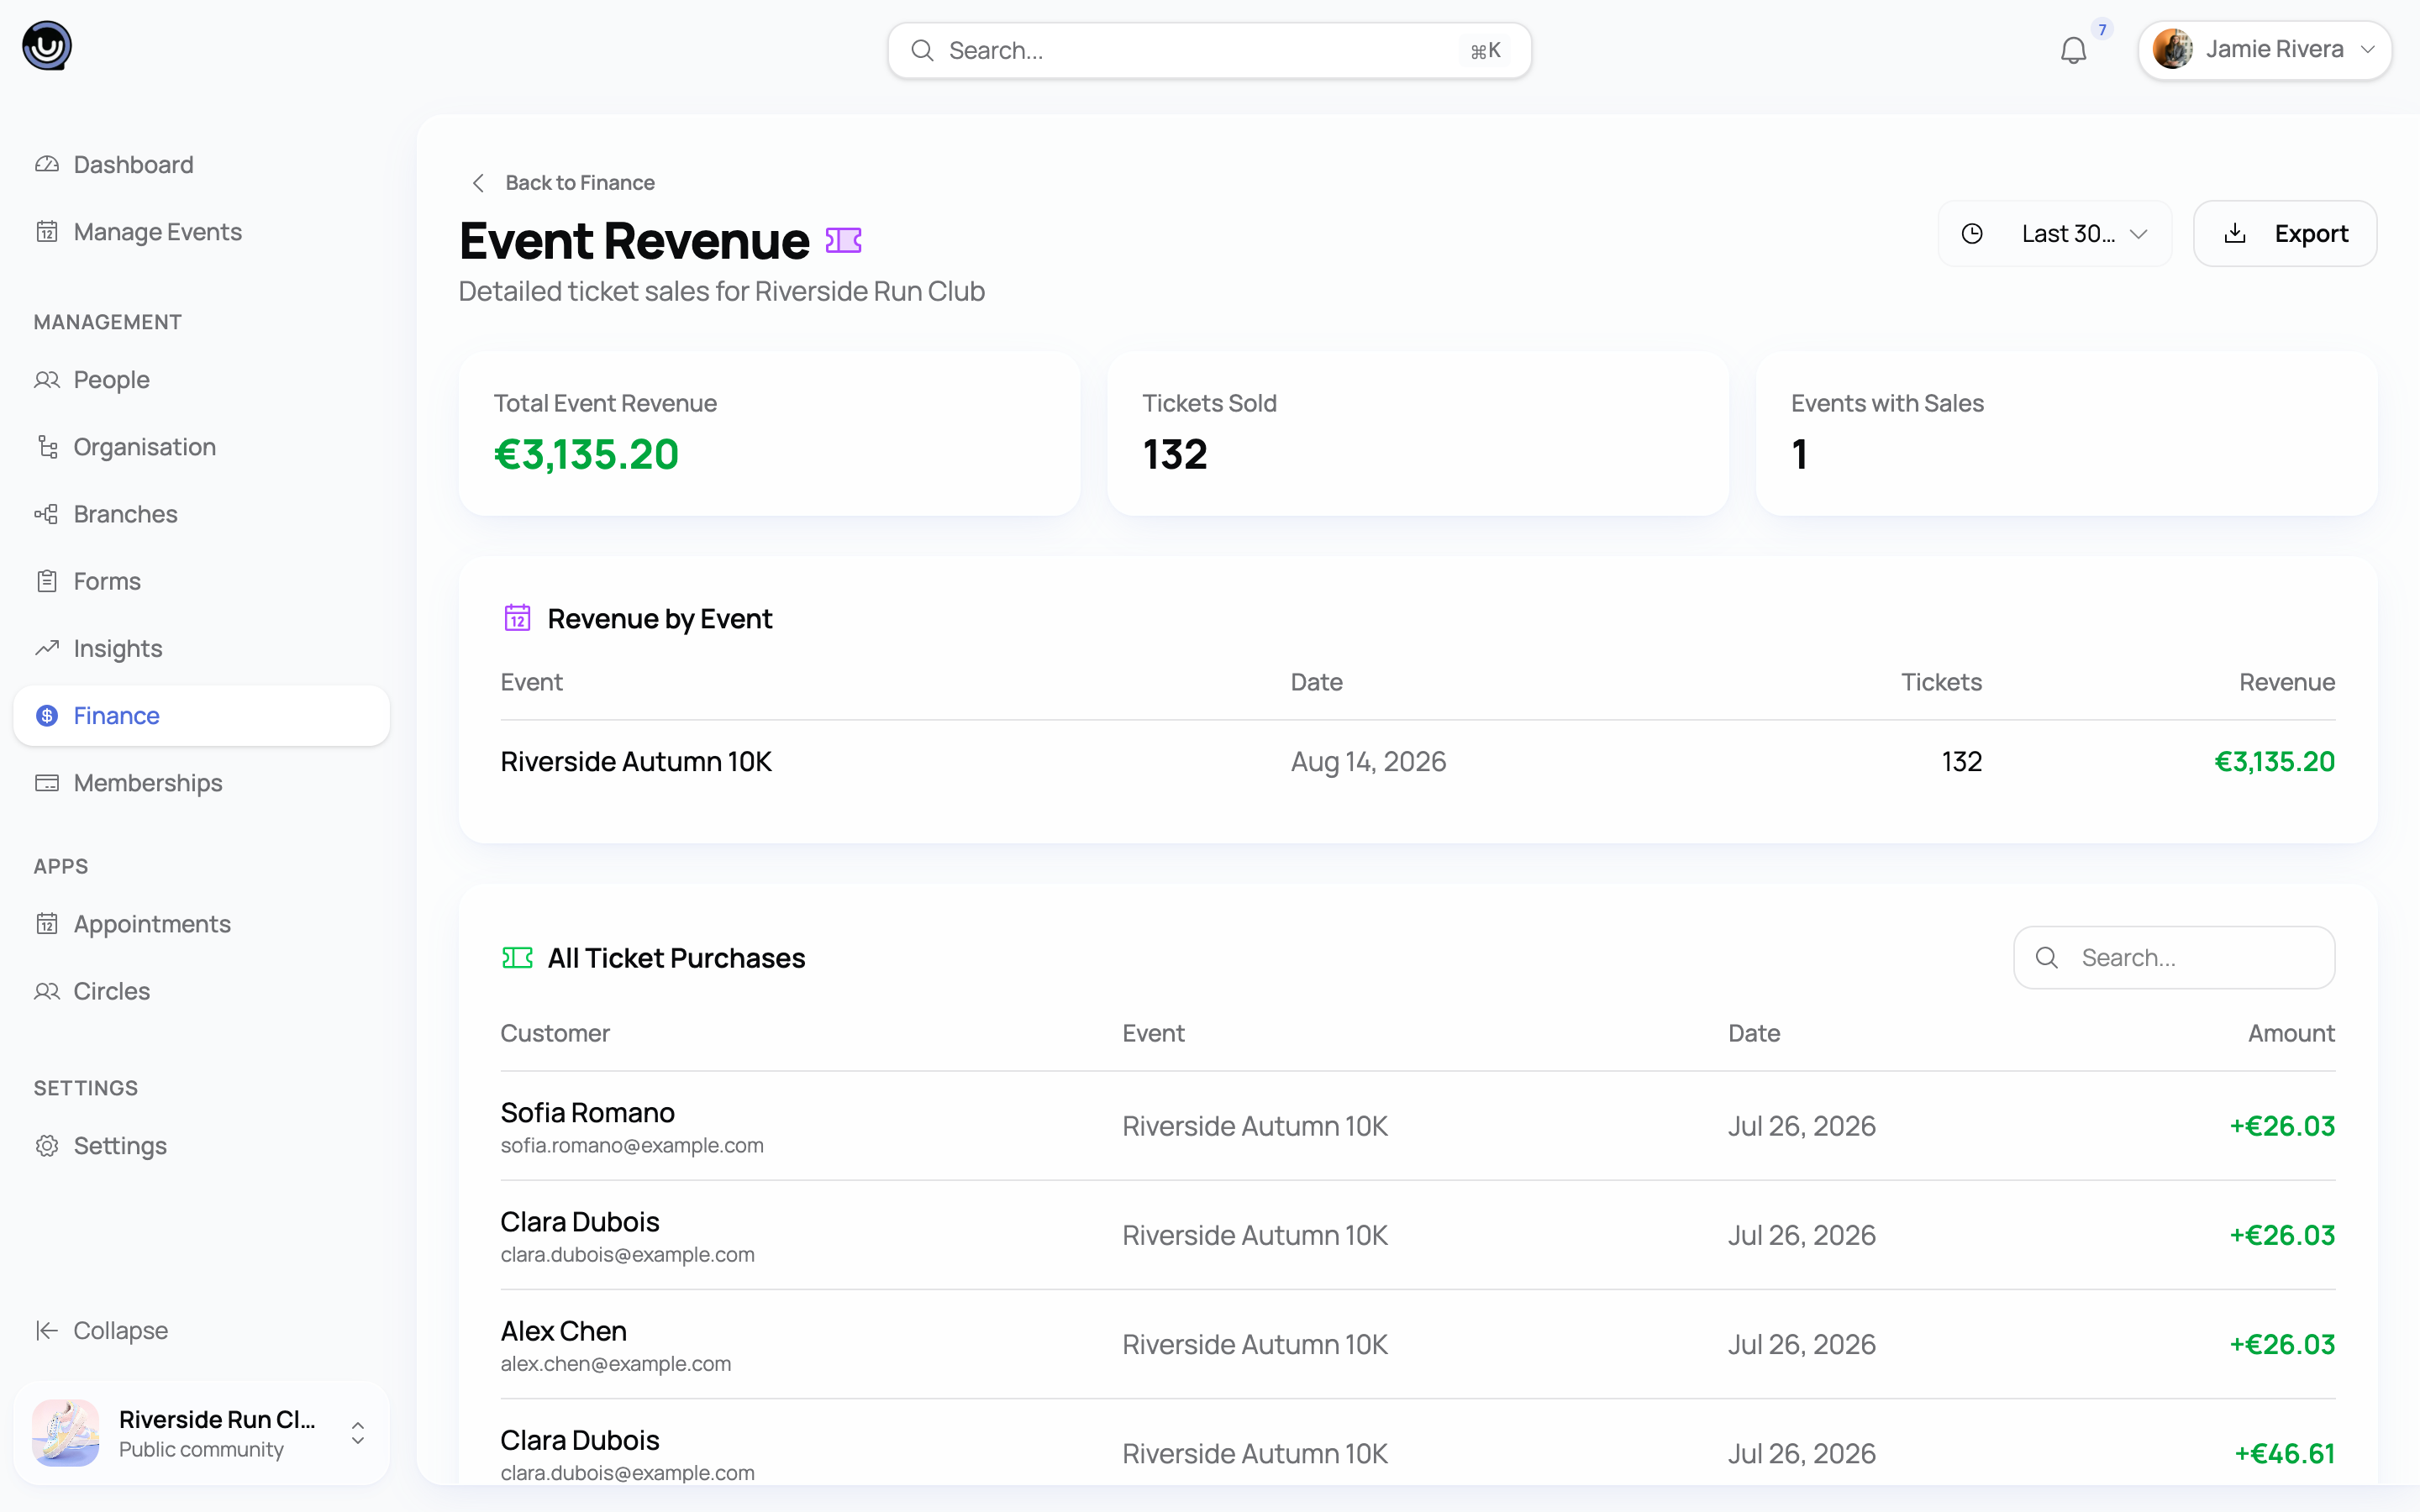
Both screens also list every individual purchase or payment underneath the breakdown table, so you can see exactly who paid what and when.
The transaction ledger
The Transactions screen is a single, unified list combining ticket purchases, membership payments, and sponsorship payments — sorted with the most recent first.
- Use the type filter to narrow the list to all, event, or membership entries. Sponsorship payments are included when you're viewing "all."
- Use search to find a transaction by description, member name, or email. Search only looks through transactions that have already loaded on the page, so if you're looking for an older entry, click Load more a few times before searching.
- Refunded ticket purchases appear as two lines: the original charge, and a matching negative line dated to when the refund happened, so your ledger always nets out correctly.
Exporting to CSV
The Events and Memberships screens both have an Export CSV button that downloads your breakdown and transaction data as a spreadsheet — handy for bookkeeping, tax filing, or sharing with your treasurer.
CSV export is a Business plan feature.
Managing your Stripe payouts
The Payouts screen is where your community's Stripe Connect account lives, and it's visible only to the community Owner. Admins get a read-only Payout Status card on the Overview screen — not set up, pending, or active — so they can tell whether money can move, but only the Owner can onboard, manage, or unlink the account.
This guide won't repeat the onboarding walkthrough — for a full step-by-step of connecting Stripe, choosing between Individual, Company, and Non-profit, and getting through Stripe's identity verification, see Connecting your Stripe account. A short summary of what you'll find on this screen:
- Account status reads Pending until Stripe finishes verifying you, then flips to Active once your account can accept charges and receive payouts. If your status looks stuck, the dashboard automatically re-checks with Stripe the next time you load the page, so a missed update usually resolves itself on its own.
- Account type — Individual, Company, or Non-profit — is set once during onboarding and shown here read-only.
- Country is fixed to the country your community was created in, and your payouts route through it.
- If that country isn't supported yet, the Payouts screen shows a waitlist card instead of a Connect button — and there's nothing to type. It names the country, shows the email address on your YeahApp account, and gives you a single Join waitlist button. Joining twice for the same country changes nothing, so a second click is harmless.
- The Overview screen carries a slimmer version of that same prompt — same country, same email address, a Notify me button instead. Both prompts are Owner-only; an Admin sees the Payout Status card and nothing else about Stripe.
- Unlink removes the connection entirely. Don't do this unless you're deliberately switching accounts — new ticket and membership charges will fail until a new account is connected.
Detailed payout history — when money actually lands in your bank account, and on what schedule — lives in your Stripe Express Dashboard, linked from this screen. Treat that as the source of truth for settled payouts; the in-app figures are about revenue and fees, not bank transfer timing.
How a payout gets released
Payouts for an event don't go out the moment it ends. There's a short review step built in first — here's the full flow, from the event's end date to money landing in your Connect balance:
Sub-communities and branches don't get their own Stripe account. Payments made within a branch route through the parent community's connected account. See Sub-communities and branches.
Platform fees by plan
The platform takes a percentage of each charge that goes through Stripe — ticket sales and membership payments. The rate depends on your community's plan:
| Plan | Platform fee |
|---|---|
| No active subscription | 6% |
| Starter | 6% |
| Pro | 3% |
| Business | 1.5% |
Sponsorship payments between co-hosting communities use a separate flat rate — see Co-hosting an event with another community for details.