
Creating a Community
YeahApp gives you one workspace where events, member data, and payments live together. This guide walks you through everything from creating your community to getting your first admins through the door.
YeahApp gives you one workspace where events, member data, and payments live together. This guide walks you through everything from creating your community to getting your first admins through the door.
Before you start
You need a YeahApp account. If you don't have one yet, sign up at the login page — it takes about a minute. Signing up is free. You only pay when you create a community.
How pricing works on YeahApp
YeahApp charges per community, not per member. Each community you run carries its own subscription — Starter, Pro, or Business — paid annually. If you run multiple communities (e.g. one per chapter, region, or brand), each one has its own plan and you pick the right tier for that workspace. Members joining your community pay nothing to YeahApp.
Step 1: Fill in your community details
Once you're logged in, look for the option to create a new community. You'll be asked to fill in a few things:
- Community name — what members will see
- Web address — your unique URL slug (e.g. yeahapp.co/your-community). This has to be unique across the platform, so if your first choice is taken, you'll get an error and can try another.
- Description — a short summary of what your community is about
- Cover image — optional, but worth setting early
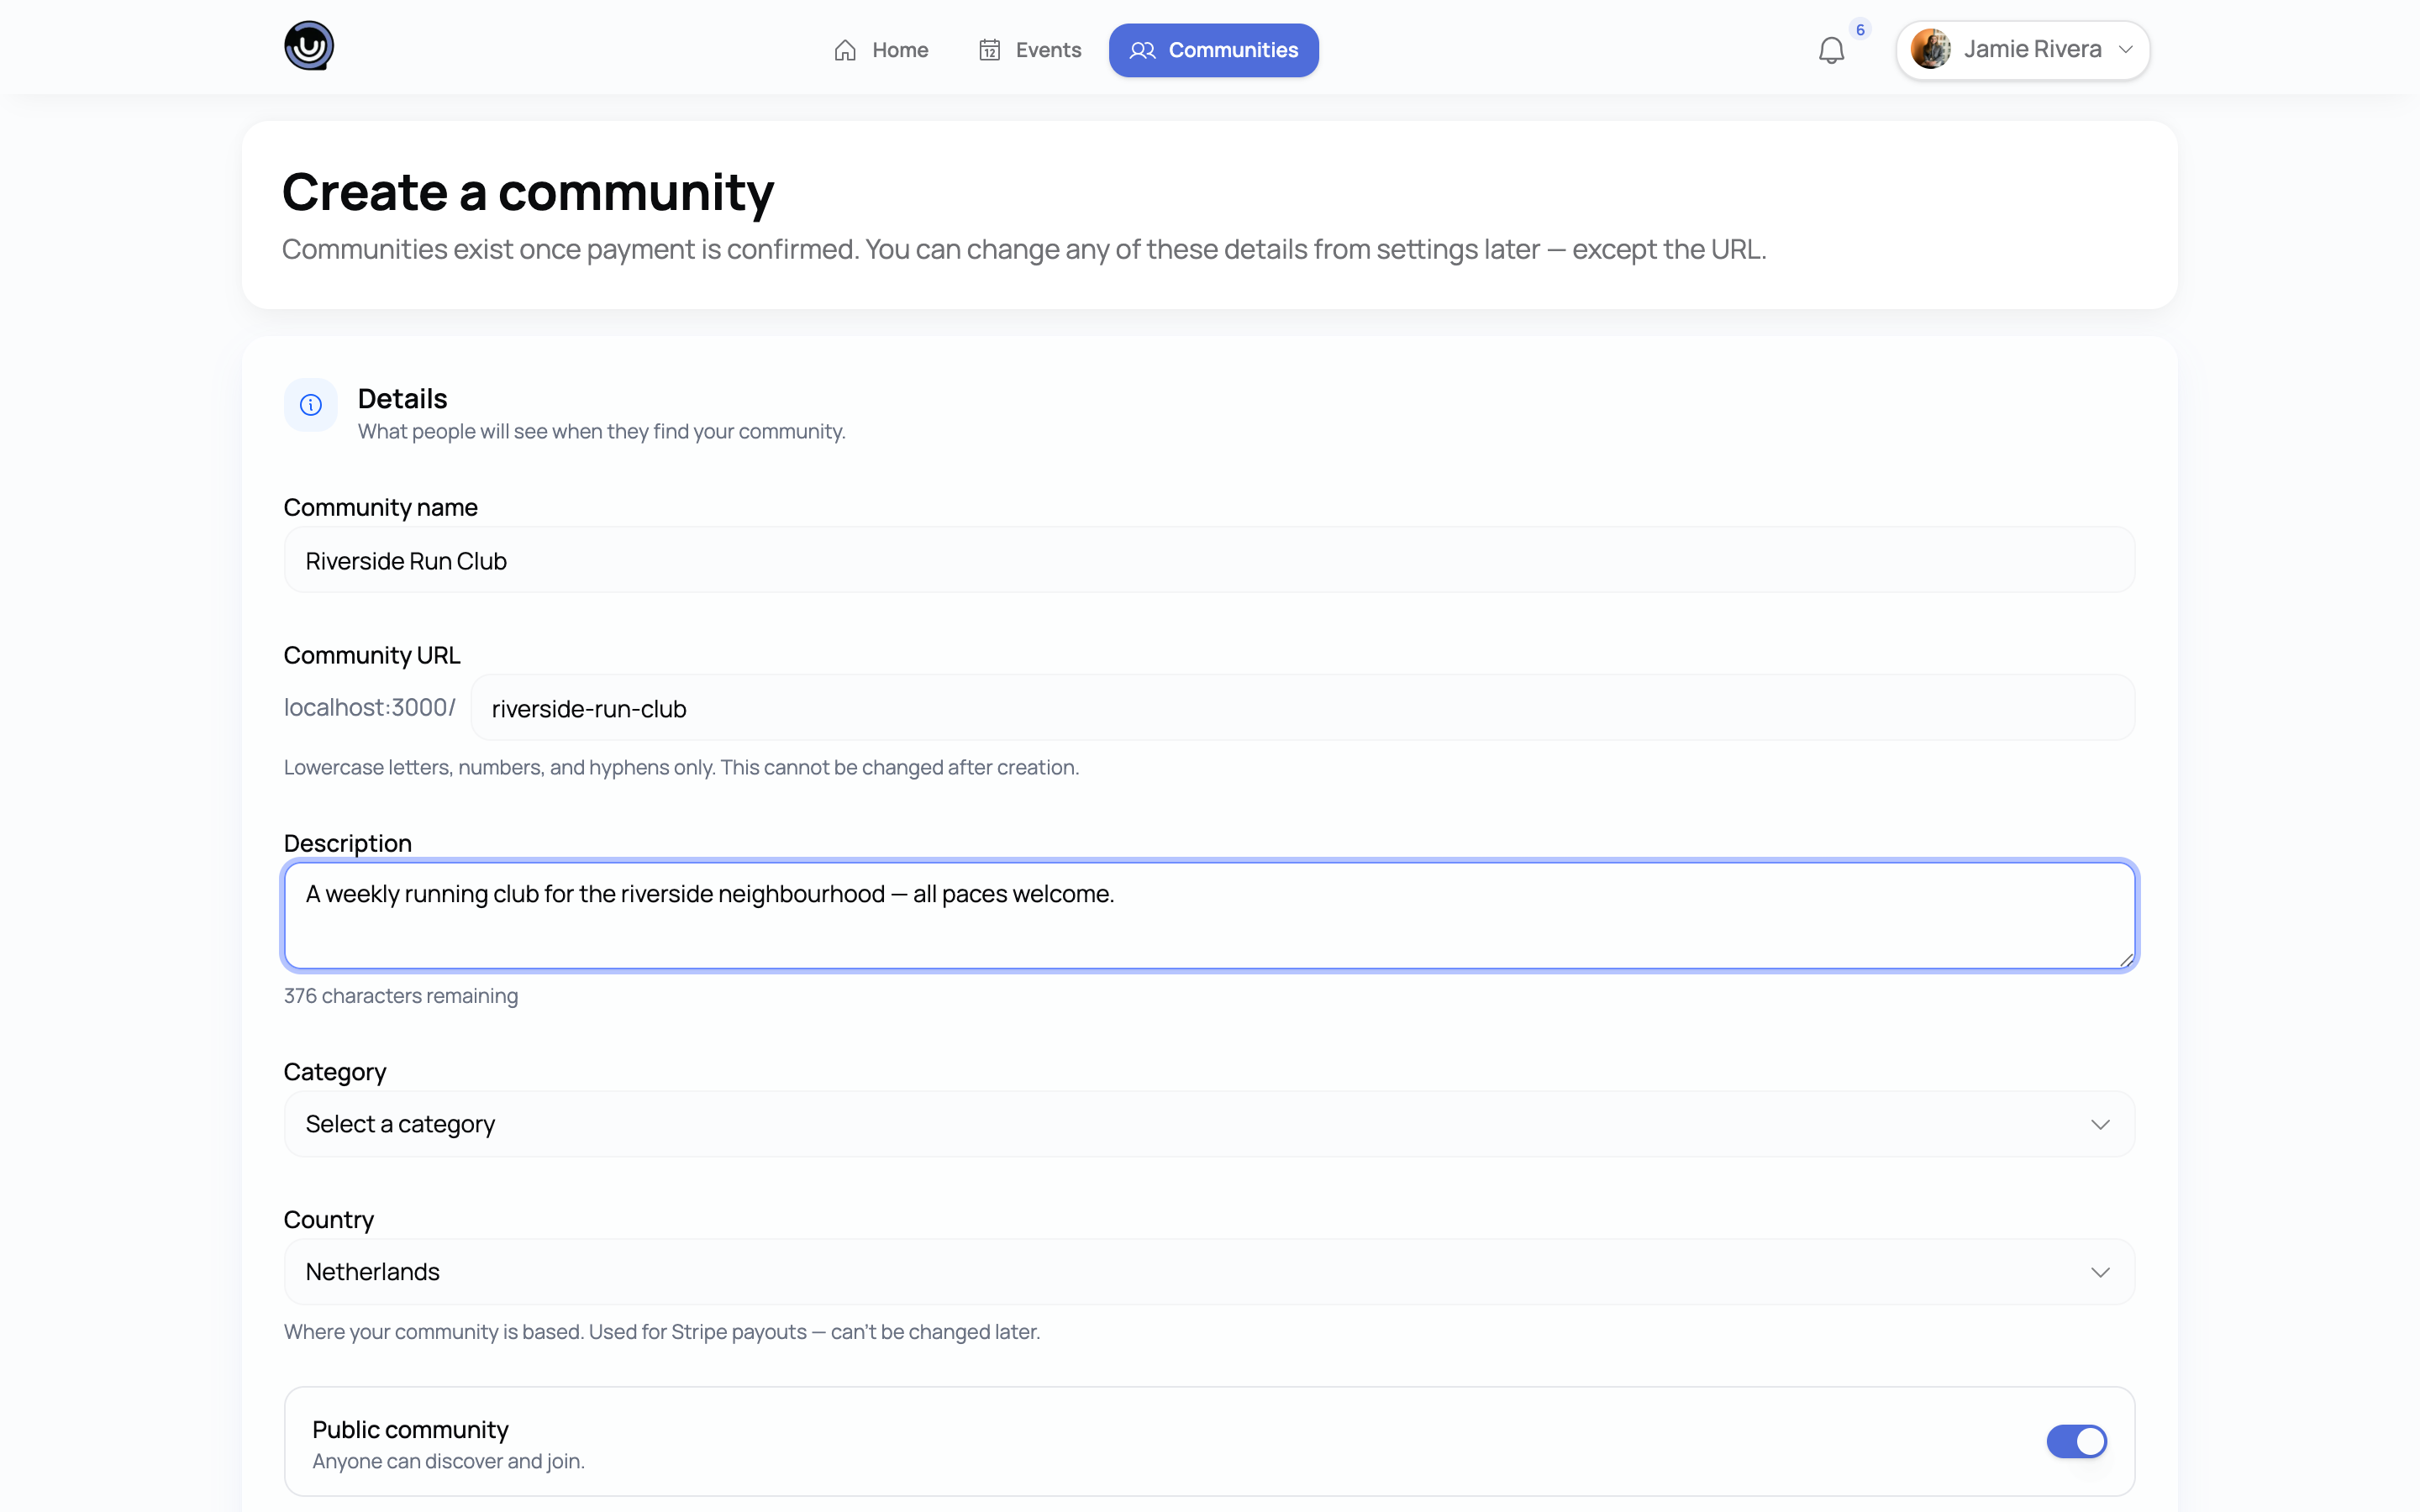
If the web address you chose is already taken, you'll see an error message. Pick a different slug and try again.
Step 2: Pick your plan
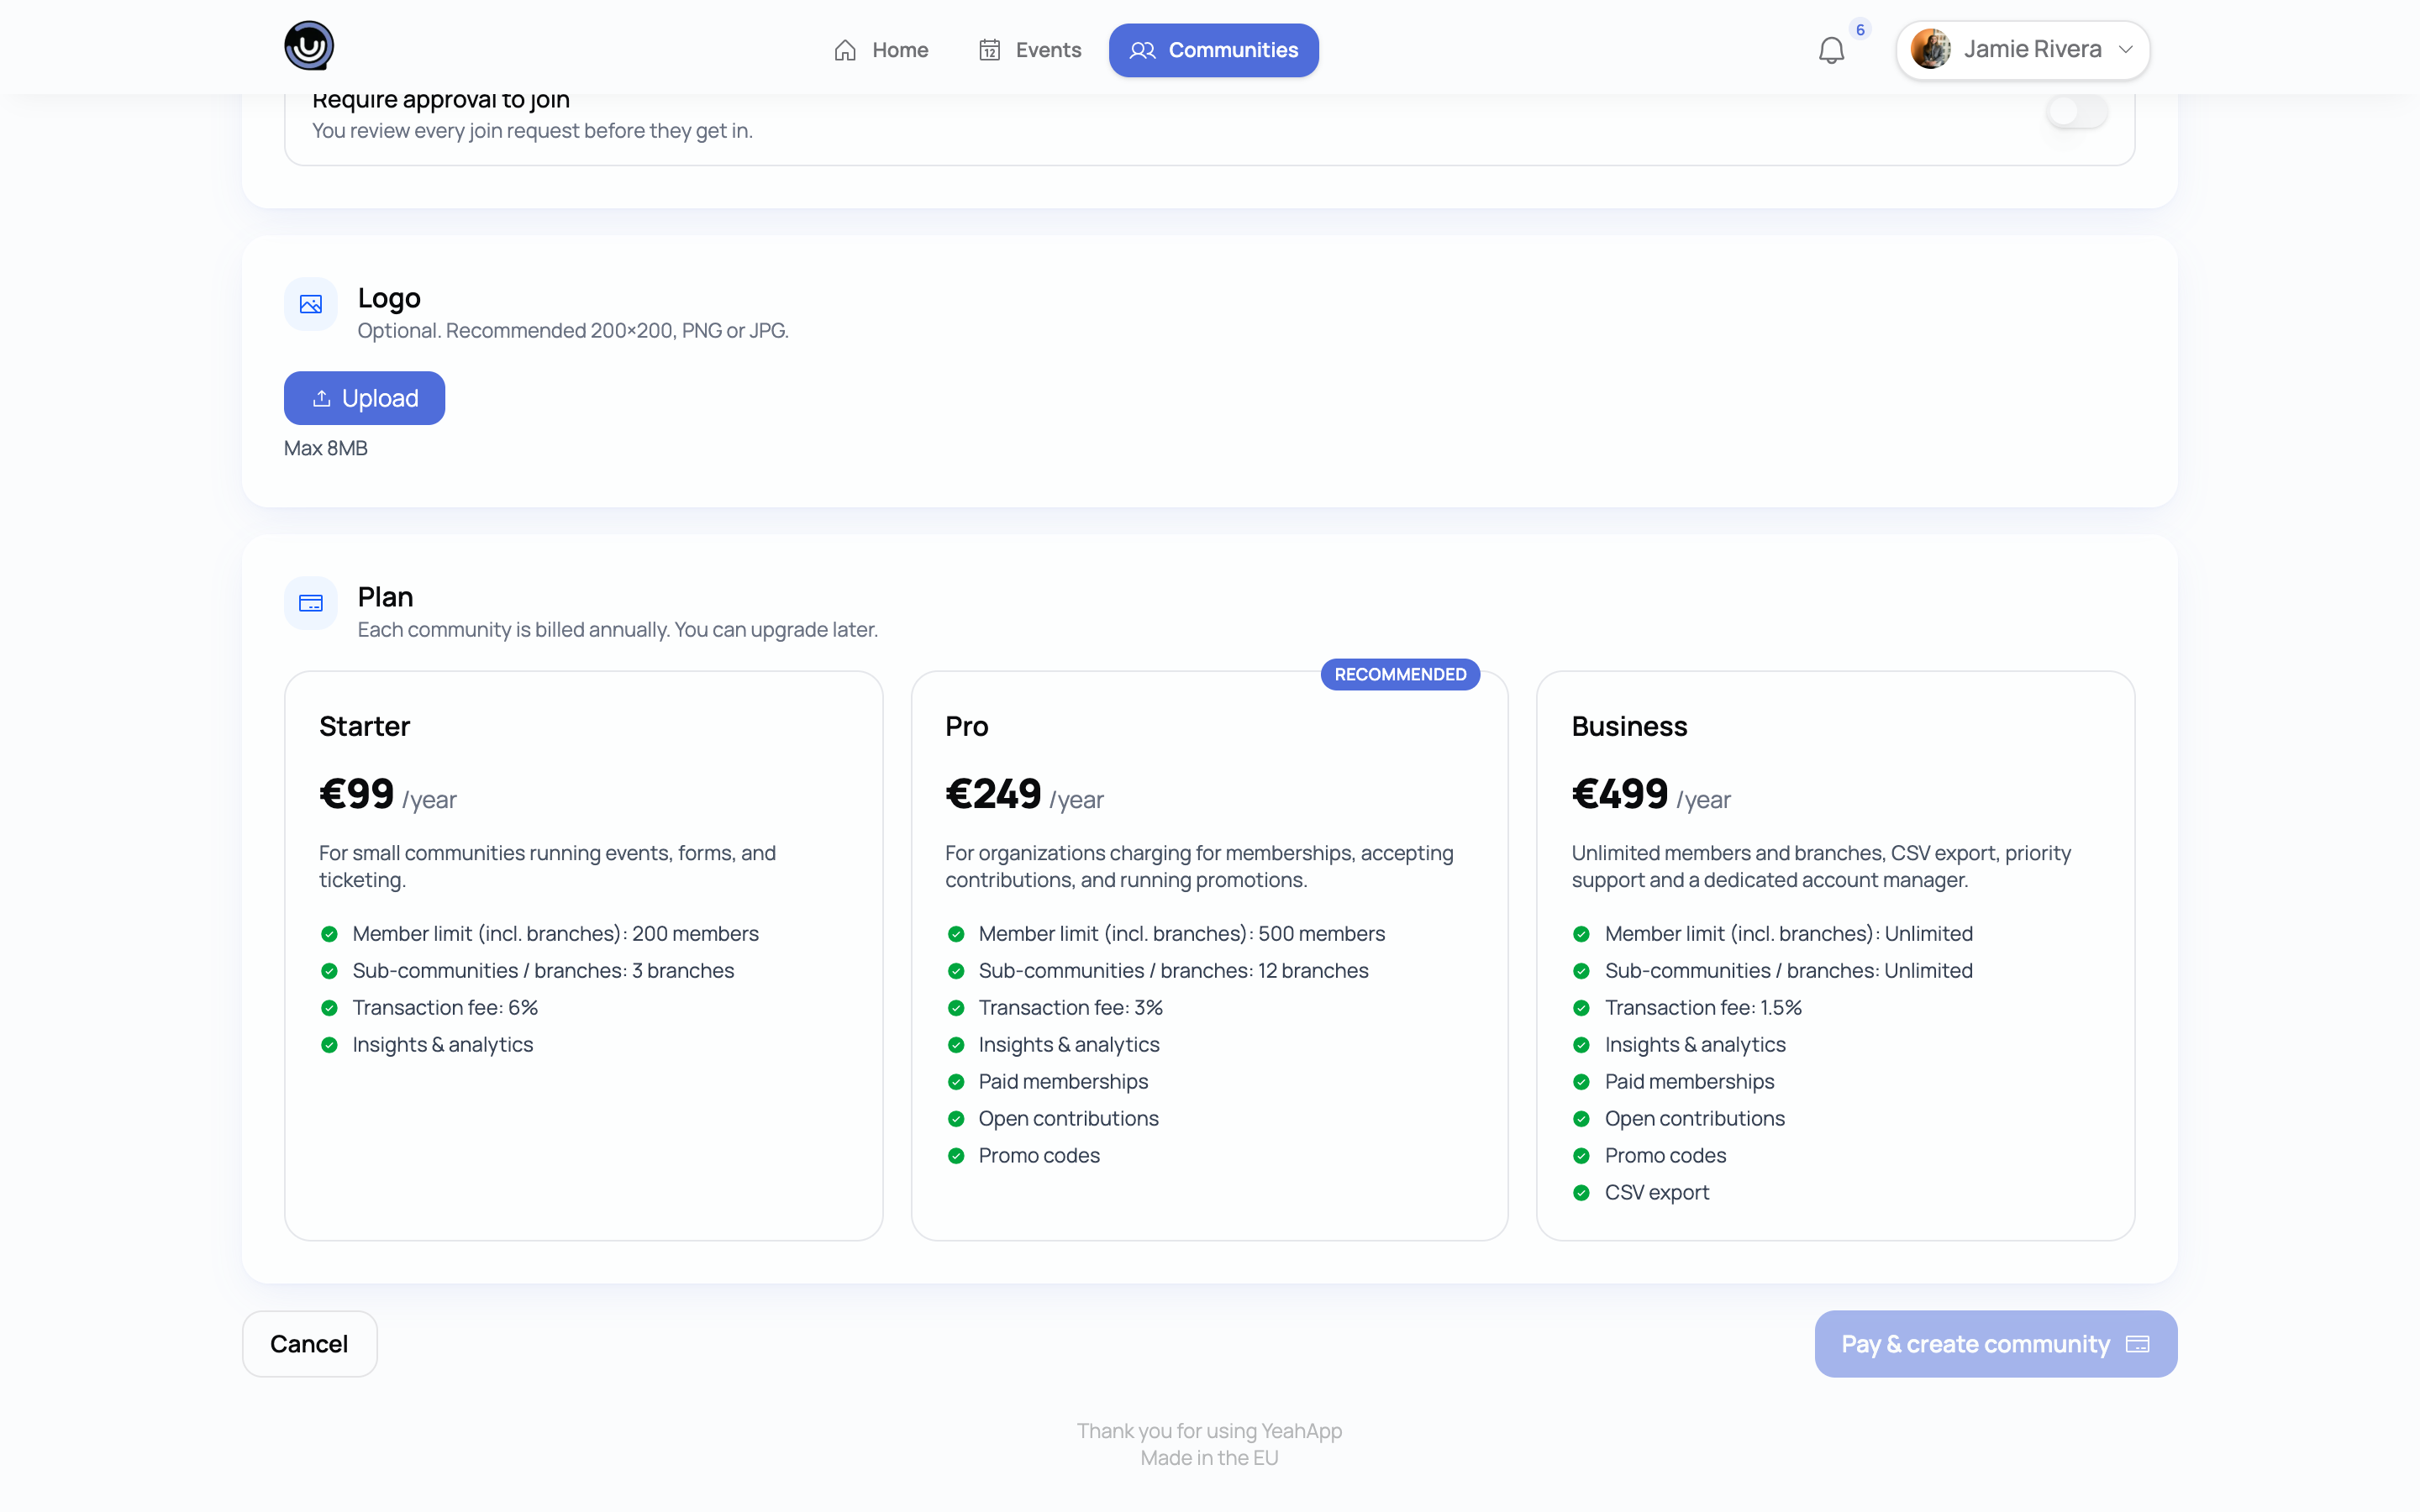
Before your community goes live, you choose the plan that fits your size and needs:
- Starter — for small communities getting started with events and ticketing
- Pro — for growing organisations that need forms, paid memberships, and analytics
- Business — for large organisations with unlimited members, the lowest transaction fees, and every feature unlocked
You can compare features in detail on the pricing page. All tiers are billed annually — one yearly charge per community. We don't offer monthly billing.
Switching plans later:
Upgrading is easy and takes effect immediately — Stripe charges the prorated difference and your community jumps to the new tier. Downgrading takes effect at your next renewal (not mid-year) — you keep the higher tier you paid for until the year ends. Full details in the Billing & Cancellation Policy.
Refunds:
YeahApp doesn't issue refunds. Cancelling means your community stays active until the period ends and then becomes read-only. That's why we offer a free demo — try it before you commit.
Click Continue to payment when you've made your choice.
Step 3: Pay and activate
You'll be sent to Stripe Checkout to enter payment details. Once the payment goes through, you're sent back to YeahApp and your community is activated.
If you close the checkout without paying, the community stays in a "pending payment" state and you can come back to finish later, or pick a different plan.
Step 4: Your community is live
The moment payment clears, your community is activated and you're automatically given full admin access. No extra steps needed — you're the owner, which means you have complete control over settings, members, events, and billing.
What "full admin access" actually means:
- Manage members and their roles
- Create and publish events
- Set up membership plans and ticketing
- Build registration forms and attach them to events
- Access community settings and analytics
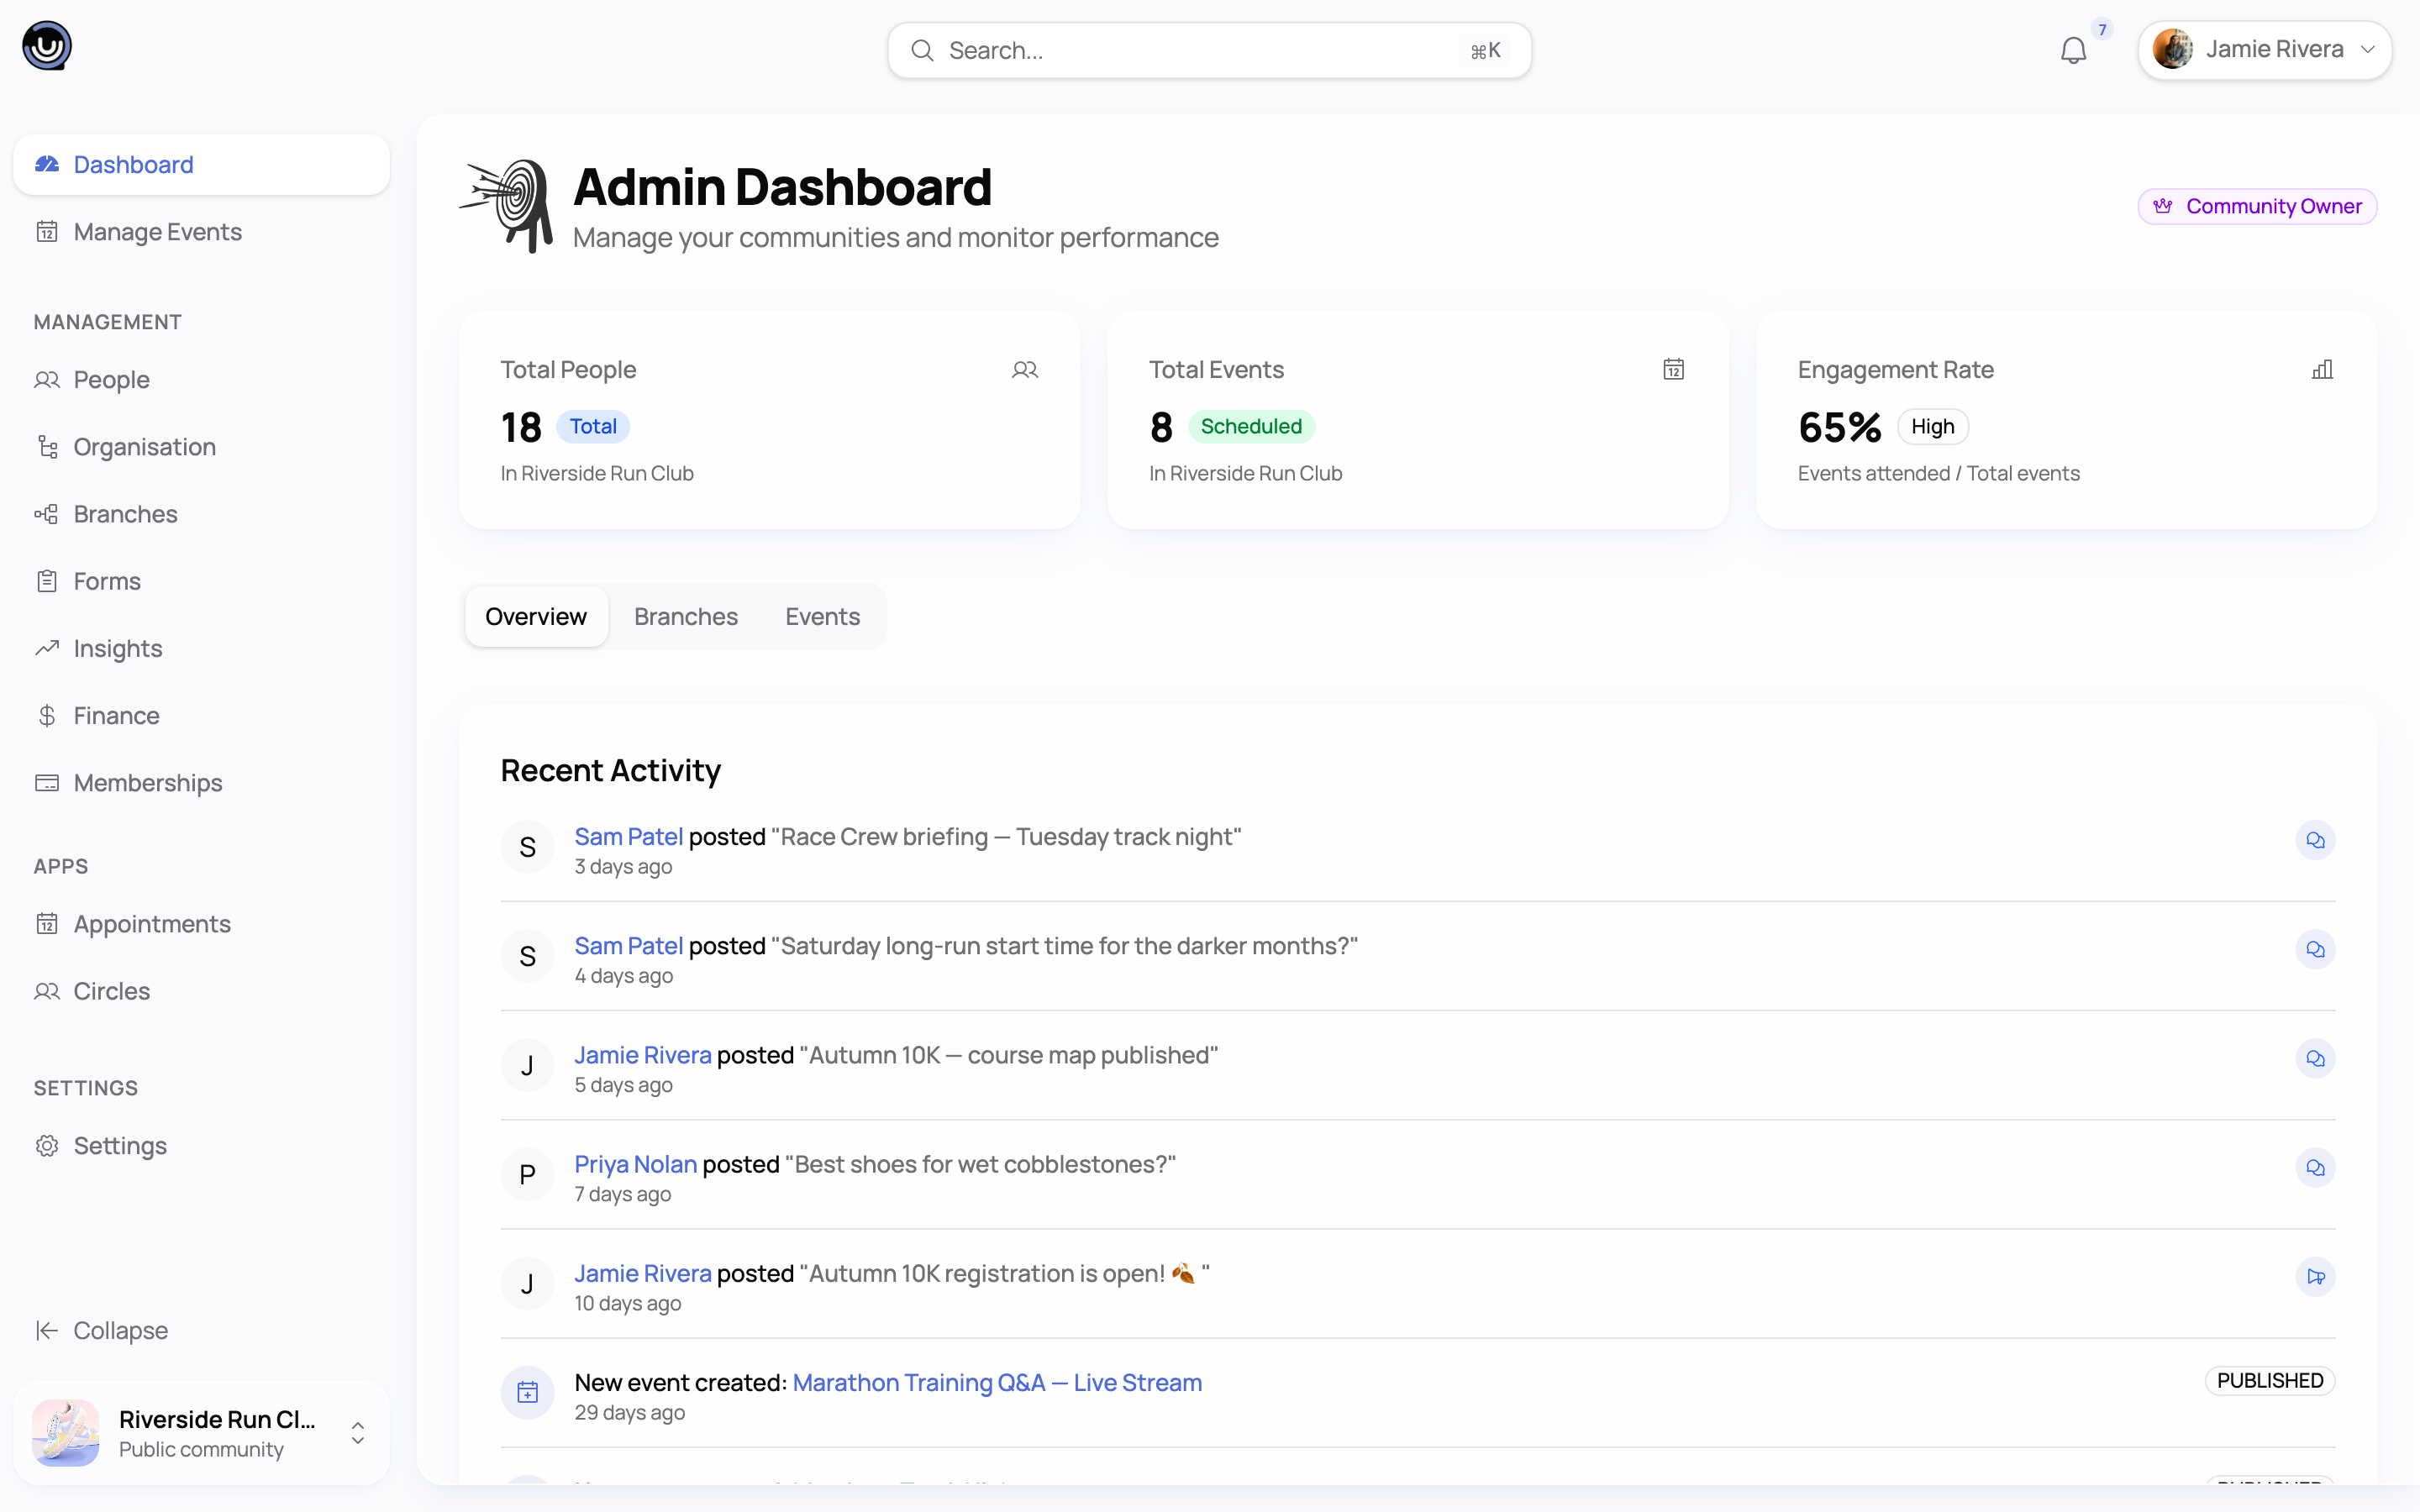
Which features you can use depends on your plan. Everything is built in — there's nothing to install or switch on. Higher tiers unlock things like paid memberships, promo codes, and member groups.
Step 5: Invite your admins
You probably don't want to run everything alone. Head to the Members section and invite your team.
- Go to Members
- Enter the email addresses of the people you want to invite
- Set their role to Admin
- Click Send Invitations
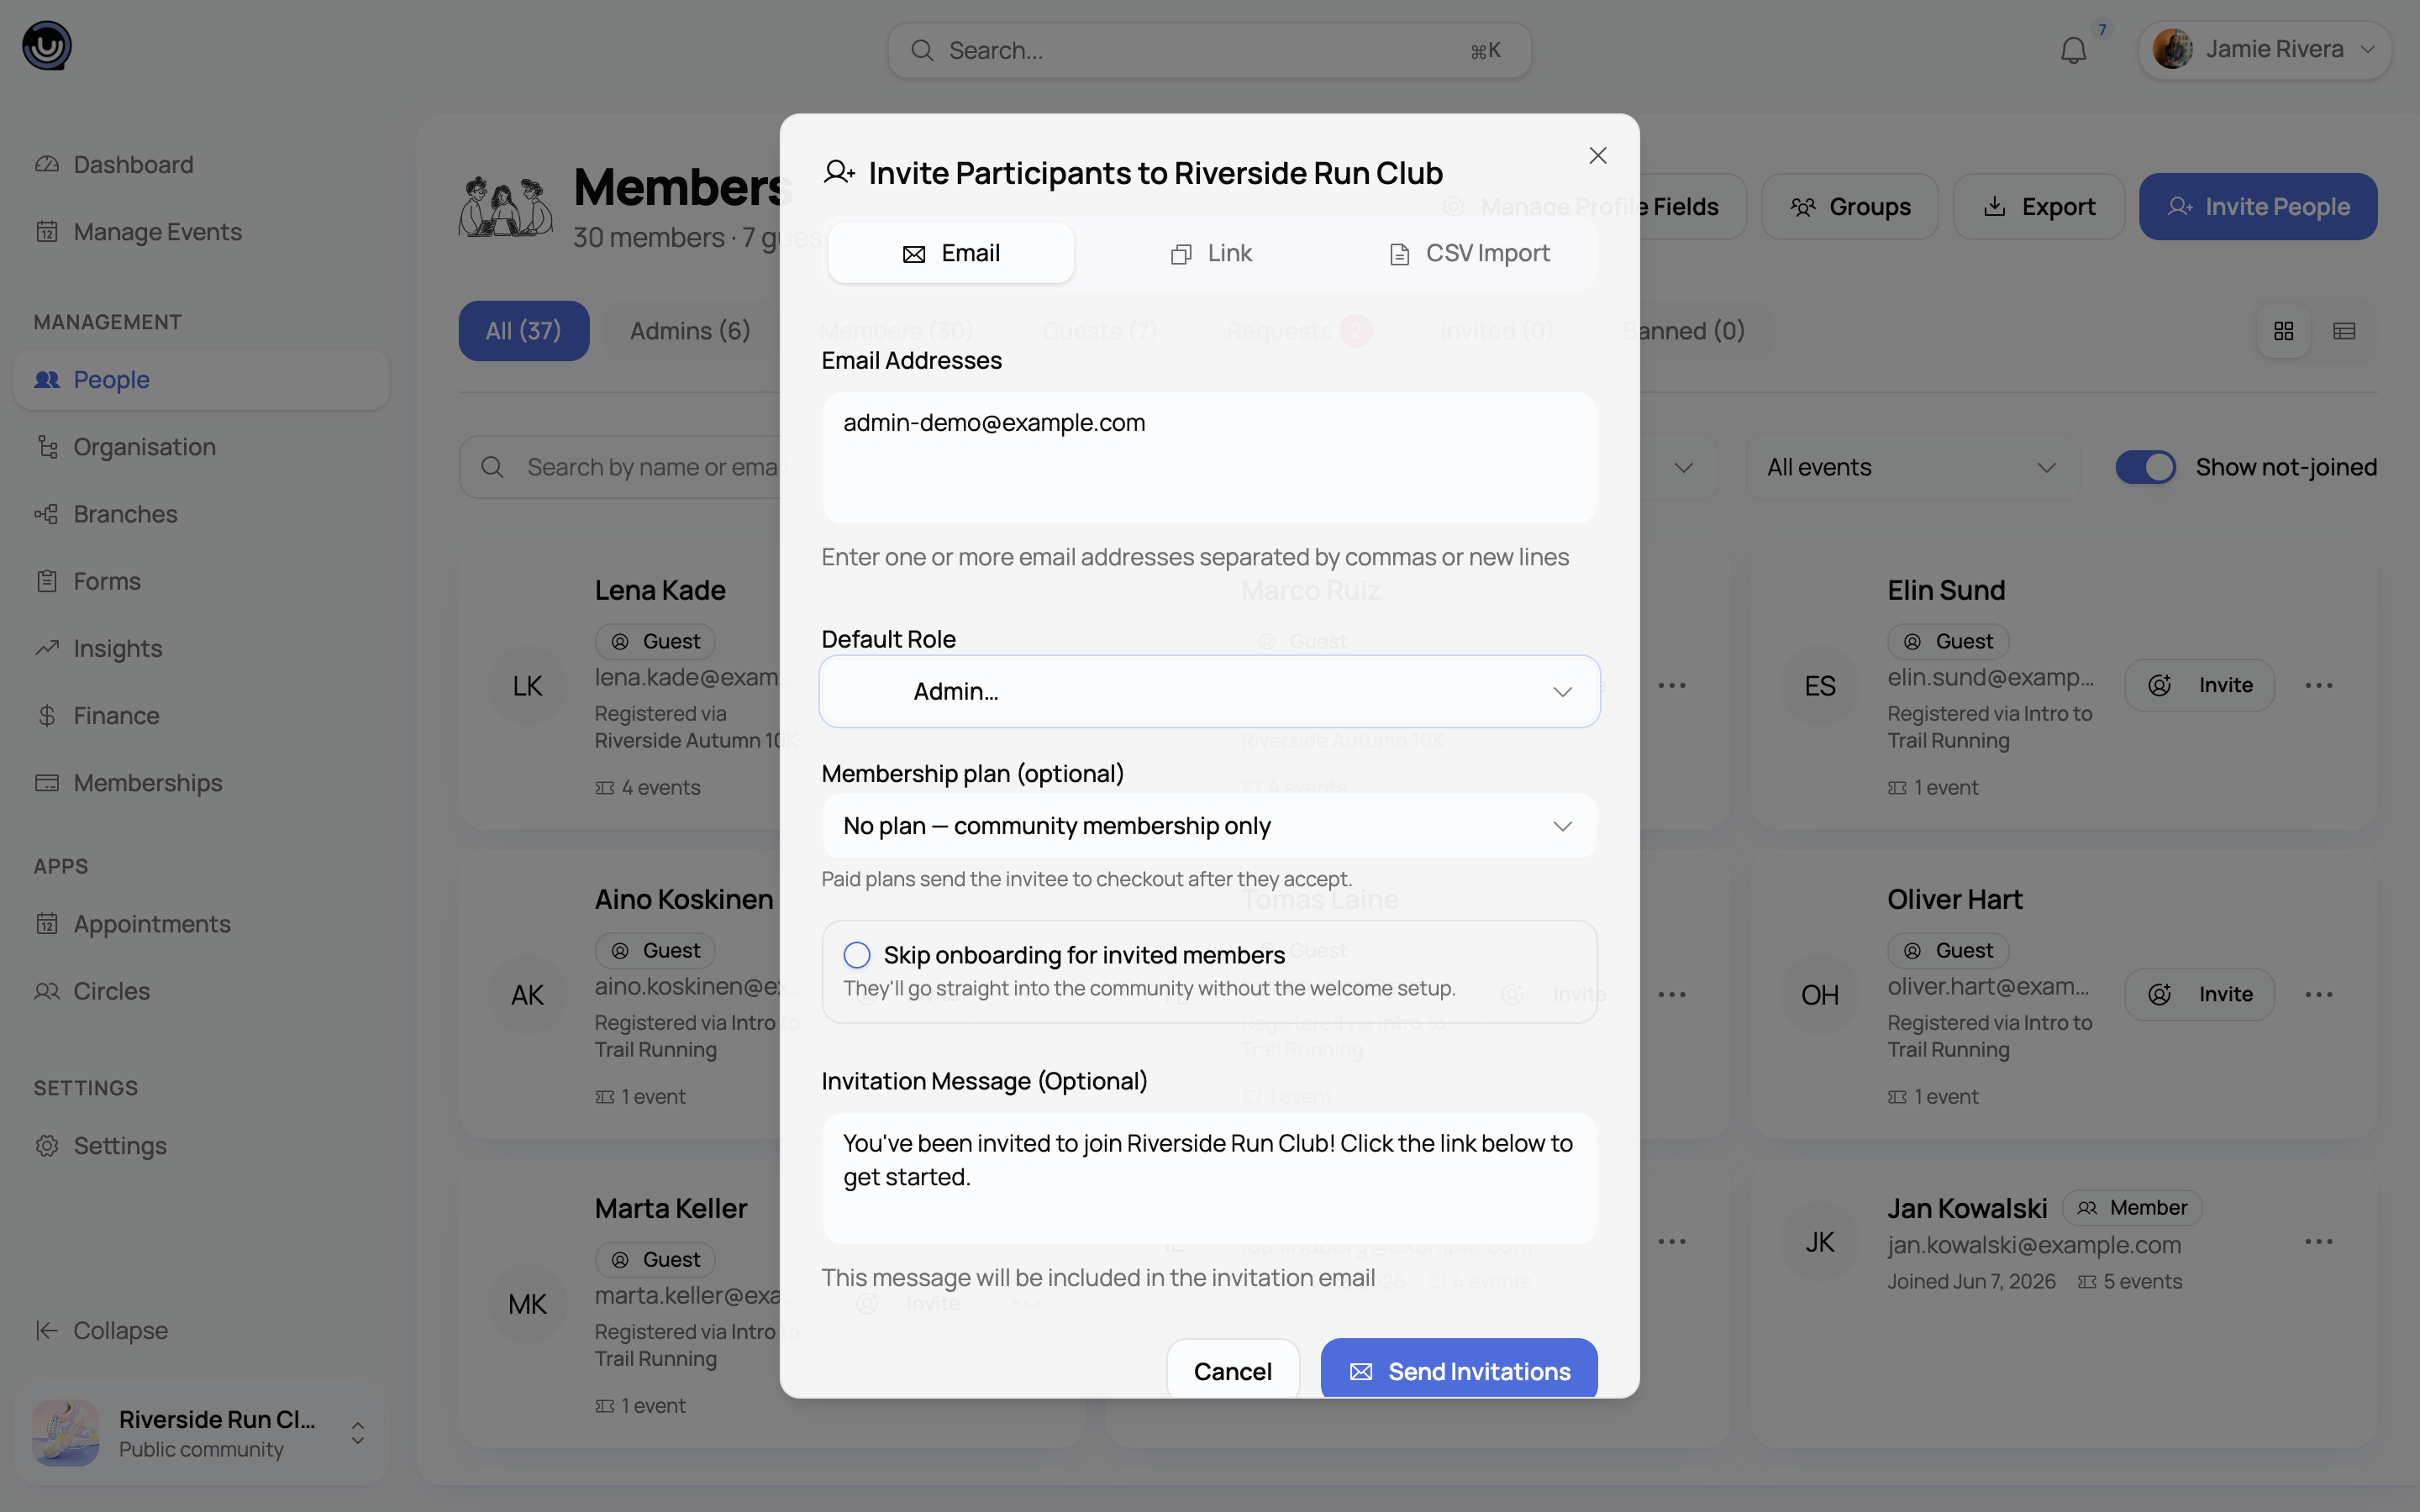
The system saves each invitation and sends an email to every address. You can invite multiple people at once.
Roles at a glance:
Below the owner, YeahApp has three community roles. Admins get full community control. Moderators run events, manage content and forms, and review join requests, but can't change settings or billing, and they can't invite, remove, or ban members. Members can join events, submit forms, and post content.
Step 6: What the invited admin sees
Here's what happens on the other side of that invitation email.
If they already have a YeahApp account: They click the link in the email, see the invitation with your community details, and choose to accept or decline.
If they don't have an account yet: The link takes them to a sign-up screen. Once they create their account, they land on the invitation page and can accept from there.
When someone accepts, they're immediately added to your community as Admin. If they decline, the invitation closes — you can always send another later.
Your community is ready
Once your first admins are on board, you have a functioning workspace. From here you can:
- Create your first event — set it as draft while you're still setting things up, then publish when you're ready
- Set up membership plans — if you want to charge recurring dues, head to Memberships (requires the Pro plan or higher)
- Build a registration form — attach it to an event to start collecting member data automatically
- Configure ticketing — for paid events, connect Stripe and create ticket types
Quick reference: the full flow
What's next
- Creating and organising an event — create your first event
- Creating a membership plan — set up recurring dues
- Connecting your Stripe account — needed before you can sell tickets or charge for membership
- Community roles and permissions — the full breakdown of what each role can do